![]()
Log in or sign up. It's FREE!
Blog entries in "DIY"
-
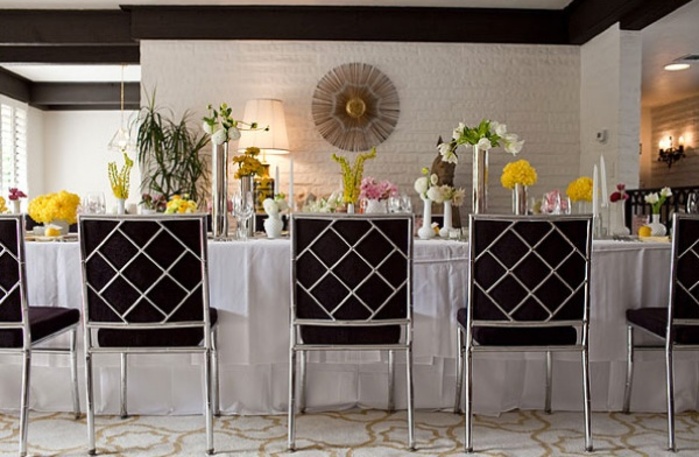
Dinner Party
My husband (so wierd to say that) and I are thinking about having Thanksgiving at our apartment this year. I think we both feel a little lost without wedding plans, so we are pouring our efforts into my favourite American holiday. I am thinking about dinner party table settings today. There is no better place to turn than to La Partie Events, an American Events company that totally gets doable DIY and simple tables that make big impact.


-
DIY Wish List
I tried to make chocolate covered strawberries last night, all in an effort to become more like Martha Stewart (part of a 'traditional housewife' phase I am going through-when I realised I am getting married in five months and can't even make my beloved a simple casserole). It seemed like a simple thing to try...strawberries are already made, no hassle there...the recipe said all I needed to do was melt some semi-sweet chocolate chips, which I thought even I could do. Turns out chocolate chips don't just melt, or they don't when you add butter to them (I thought the butter would make it creamy...it didn't). I ended up with a chocolate powder-ish, marshmallow- type structure, which needless to say is not fit for dipping strawberries in. Project failed. It is a good thing my domestic prowess is not the reason my fianc� is marrying me, and that he can cook really well! Anyways, it got me thinking about DIY and even though I would not dare try a DIY wedding project, I think people who can do it are so awesome! Here is my DIY wish list (things I wish I could do if I was not arts-and-crafts-inept).
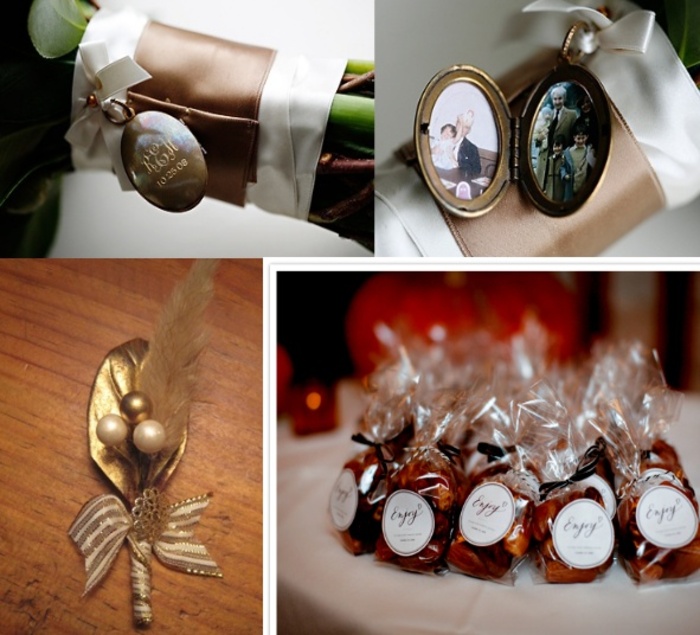
1st montage top left from Classic Bride, bottom left and right and above from 100 Layer Cake.
-
DIY Wedding Headband
-
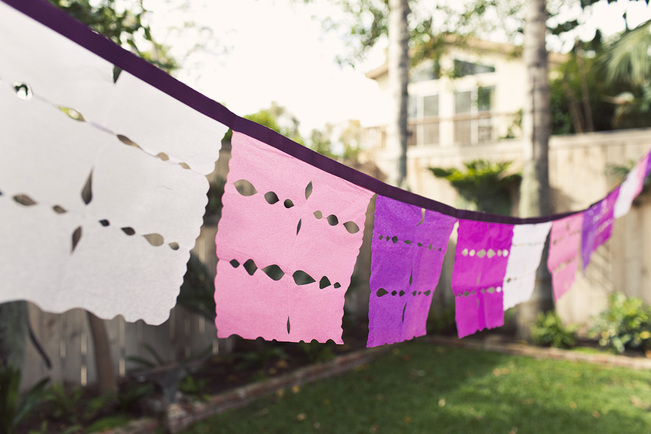
DIY Weddings: Papel Picado Flags
A cute and easy DIY project to create your very own Papel Picado flags. Hang them in the church or drape them around you reception room to help add a splash of colour to your big day.
Materials
� Various colours of tissue paper - maybe in your wedding colour theme
� Double sided tape or glue
� Scissors
� Ribbon
� Paper for template
Step-by-step
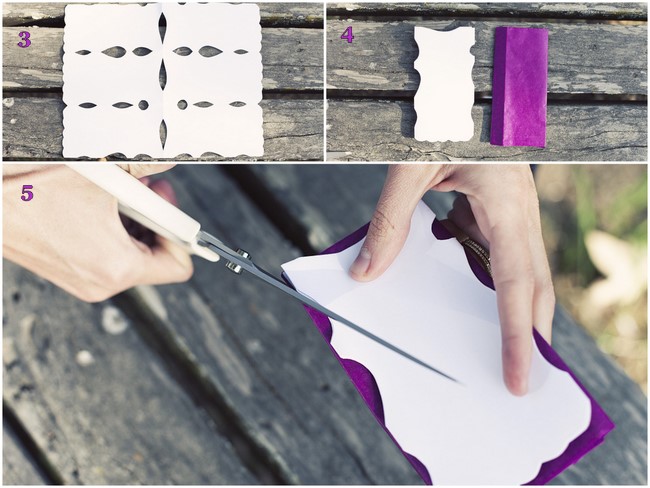
1. Fold paper for the template into 1/6s length-wise. Once paper is in 1/2, fold it into 1/3s.

2. Cut small shapes along the folded sides of the template.

3. Open to see if you like the pattern.
4. Then lay the template over the tissue paper, which should be folded in the exact same way the template is.
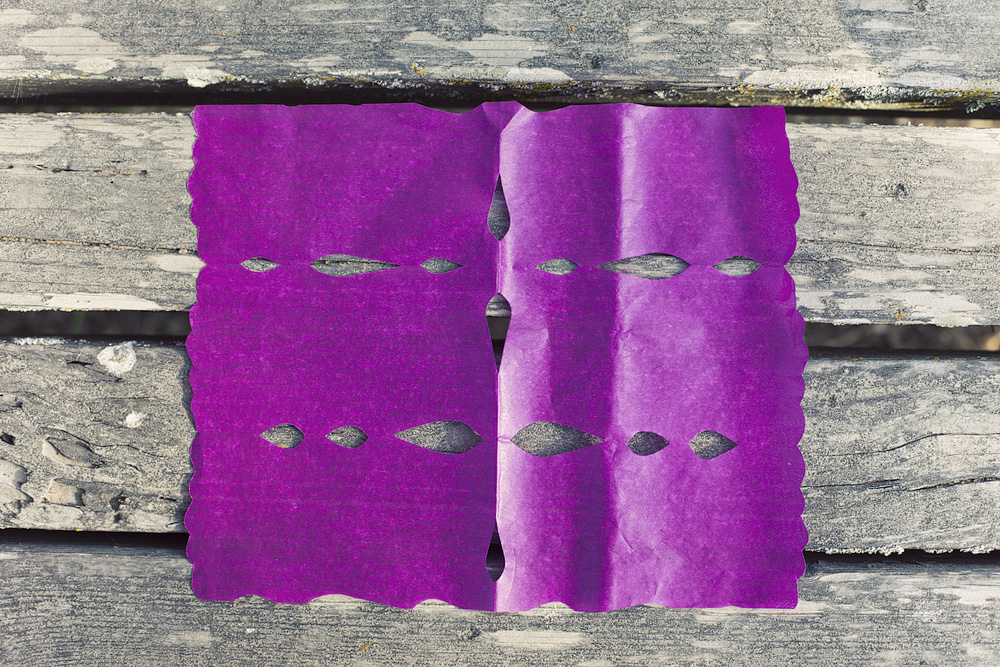
5. Cut the tissue in the same pattern as the template.
6. Unfold and repeat in the same way for other colours of tissue.
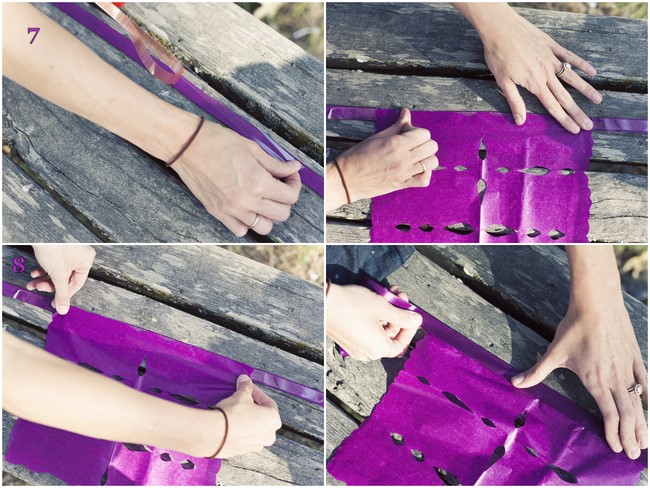
7. Lay ribbon out and stick different colour tissue flags side-by-side on the ribbon with the double sided tape or glue. Leave about enough space either side so the banner can be tied up.
8. Stick another piece of ribbon to the front side of the banner.
9. Now hang it up and stand back to admire all your 'hard' work!
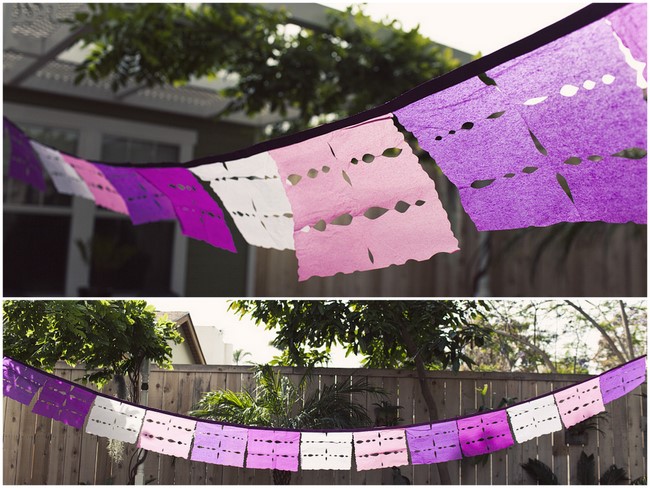
As seen on GreenWeddingShoes.com. Images by Katherine Elizabeth Photography.
-
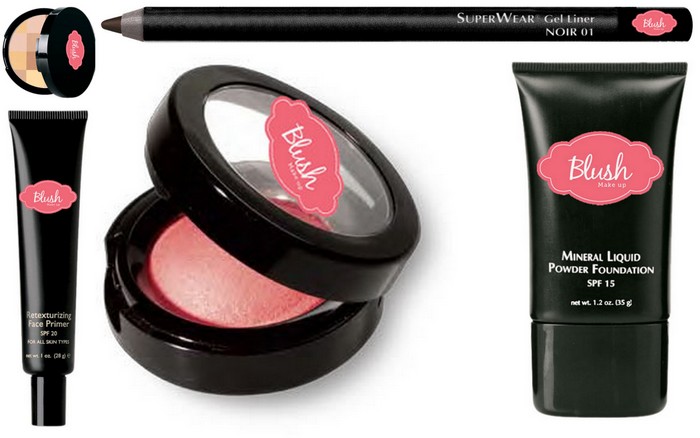
Step-by-Step Bridal Beauty by Blush
Beautiful bride Katie Fox was married on March 30, 2022 with reception afterwards in Ballybeg House, Co. Wicklow. Nicola Walsh of Blush gave Katie a glamorous look, with gorgeous smokey eyes, bronzed cheekbones and a subtle lip!
.jpg)
How to achieve Katie’s look:
Step 1: Prep and Prime - Begin by applying the Retexturising Face Primer to the skin. This is a clear weightless serum (paraben-free) that leaves an opalescent smooth finish. Secondly, apply the Liquid to Powder Foundation SPF20 in the Pale Almond shade, starting at the centre of the face and blending outwards towards the hairline and just under the jaw line. This product is ideal for brides, as it’s mineral-based and leaves an air-brushed finish to the skin. Nicola says: “It’s a fantastic product for photographs.”
Step 2: Eyes - Using the Signature Shadow Quad in Influencer shade, apply the highlighter to the whole eyelid. Highlighter provides a powder base for eye shadow, which not only avoids damp patches on the eyelid but also allows the shader shadow to blend smoothly when applied. Using the shading colour in the palette, apply eye shadow to the outer corner of the eye and blend inwards in the crease of the eye to create a soft smoky finish. Brush the remainder shader shadow one-third of the way under the eye. Tip: Use a little shadow at a time by dusting the excess off your brush. The best smoky finishes are achieved by building shadow rather than heavy application.
Now use the Superwear Gel Liner in Noir, and apply eyeliner along the top lid and the bottom one-third. Our Waterproof Mascara in black provides a luscious look to complete the lashes.
TIP: The less darkness under the eyes (liner, mascara and shadow), the more open your eyes will look, ideal for brides!
Using the Brow Shader Pencil in Blonde, brush lightly through the eyebrows to enhance your natural colour.
Lashes were also applied, but only to the outer eye corners to keep the look as natural as possible.
Step 3: Cheeks - Here I have used our new Baked Blusher in Nectar, leaving a subtle glowing cheek.
TIP: Use just a little blusher at a time (dusting off any excess) and building the coverage you wish to achieve.
Step 4: Lips - Line the lips with Slimline Lip Pencil in Deep Natural, and then apply Micro Bubble Lipstick in Micro Sunberry shade. Follow this with Lip Lacquer in Crystal Pink.
Step 5: Bronzer - For an overall glow, use Mosaic Bronzer lightly dusted all over the face.
See more one bridal beauty!
Related Content:


-
Step-by-Step Bridal Beauty by Fiona Burnell
Beautiful bride Rachel Kelly chose a natural and elegant look for her ‘I do’ day! Make-up artist Fiona Burnell gives us step-by-step instructions on how to achieve Rachel’s mak-up and how to give this look a night time feel!

Fiona says, “In order to get the most out of your make-up, it’s very important to have a good foundation to start with and exfoliate and moisturise your skin first before any make-up is applied.”Tip: It’s important to have regular facials or a good home care routine of cleansing/toning and moisturising on a daily bases. Try to exfoliate at least once a week and have a facial every few months to deep cleanse before your wedding. Then your make-up will feel and look radiant.
How to achieve Rachel’s look:
Step 1 - Start with a quick cleanse/tone and moisturise. Apply Clarins Beauty Flash Balm, which is a great base to keep your make-up in place all day and gives a lovely even finish to your foundation.
Step 2 - Add MAC Studio Sculpt Foundation which gives a nice dewy finish. Also, apply a little of Hollywood Shimmer by Benefit which can be mixed into your make-up or just applied after where ever you want a sultry glow. Contour under cheek bone to ear with matt bronzer and apply your MAC Dainty Blush to the apples of your cheeks.
Step 3 - Define the brows with light/medium powder by Bare Minerals and brush through. You could also use pencil if you prefer.
Tip: It’s important to have eyebrows shaped in advance to give great definition and frame the face.
Step 3 - A cream base was then applied all over Rachel’s eyelid and under eyebrow to highlight. After this, contour the crease of the eye with beige and using the darker brown, apply to the outer corners in a ‘C’ shape and along the lash line. Using your eyeliner, gel or pencil (Clarins Black Kohl Pencil is great) lightly go over the top lash line - start on the outside and taper off at the inside of the eye. You can go back to outer corners to create a slight flick keeping it natural. Finish with black mascara rolling from root to tip with a vibrating effect to separate the lashes.
Step 4 - Finally, apply a natural lip liner like Christian Dior Lipstick in a gorgeous strawberry shade and dab with a clear gloss to finish.
Night Time
This is a very simple look to wear just about anywhere because it's so natural and still brings out all of your best features and it's perfect to add to if you want a more dramatic look for night time. Just add a darker shade of brown for intensity to the eyes and a bit more liner - liquid or gels are stronger for this look. And finally, a red lip will help to add a touch of evening glamour!
Related Content:

.png)

« Previous Page12
Categories
Archive
- June 2012
- May 2012
- April 2012
- March 2012
- February 2012
- January 2012
- December 2011
- November 2011
- October 2011
- September 2011
- August 2011
- July 2011
- June 2011
- May 2011
- April 2011
- March 2011
- January 2011
- December 2010
- November 2010
- October 2010
- September 2010
- August 2010
- July 2010
- June 2010
- May 2010
- April 2010
- March 2010
- February 2010
- January 2010
- December 2009
- November 2009
- October 2009
- September 2009
- August 2009
- July 2009
- June 2009
- May 2009
- April 2009
- March 2009
- October 2008
- September 2008
- May 2008
- March 2008
- November 2005
- October 2005
- March 2003
Follow Us: