![]()
Log in or sign up. It's FREE!
Blog entries in "DIY"
-
Colourful Wedding Nails
The traditional look for a bride was the French manicure - a style that’s classic and always looks elegant and refined. But more and more brides are now opting to mix it up a little by adding some colour to their overall look - and a striking nail polish is the perfect way to go!

Image by Brooke Courtney
The best colours to go for - if you don’t want your photos to age too much - are reds (bright or dark) or dark browns. Bright reds are fun and flirty and will really stand out to give you a cute and kitsch look, while dark reds and browns will look elegant and stylish without overshadowing the rest of your look.
If you are an ‘all or nothing’ type of bride, then consider going for a colour that’s a little more daring like neon pinks, bright yellows or even greens. You could also match your nails to you bridesmaids’ dresses or to your overall colour scheme.
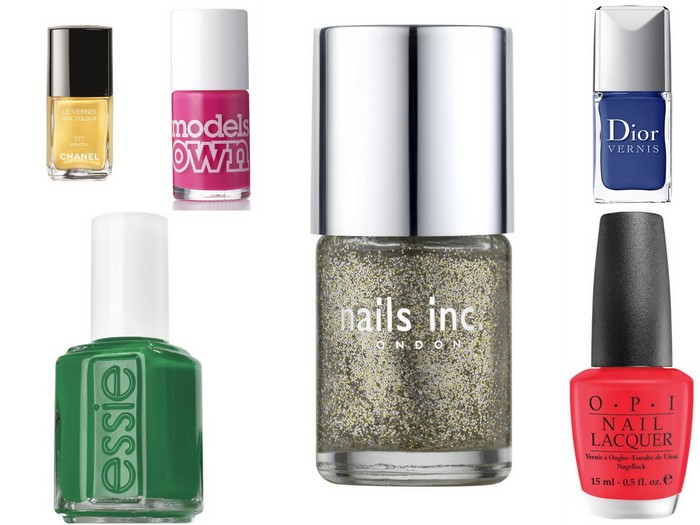
Get your nails professionally done so as to ensure they are looking their best on the day and make sure to take really good care of your hands and nails in the run up to the wedding. Hand and nail creams, cuticle creams, a clear varnish and plenty of calcium should guarantee your nails are at their best when you go to the salon.
You can bring your own colour polish to the salon if you like, most manicurists won’t mind, however, make sure you invest in a great one because, unlike a French manicure, a chipped nail will be very noticeable while wearing blood red!
To get the wedding nails that are right for you see: Breda O'Neill - More Than Make-up; Blush - Nicola Walsh; Amelda Faherty Make Up Artist or the Pillo Hotel & Spa.
Related Content:


-
Ceremony Decor: Aisle Style
Whether you're having a church, civil, or an outdoor ceremony you can add something special to liven your aisle up, or to bring a little colour and personality to your chosen venue. From wedding aisle runners, to rose petals to teepees, there's lots of ways to bring a little of what you like to your ceremony. Have a look at some of our fave ideas that will work whatever your budget may be. By Karen Birney
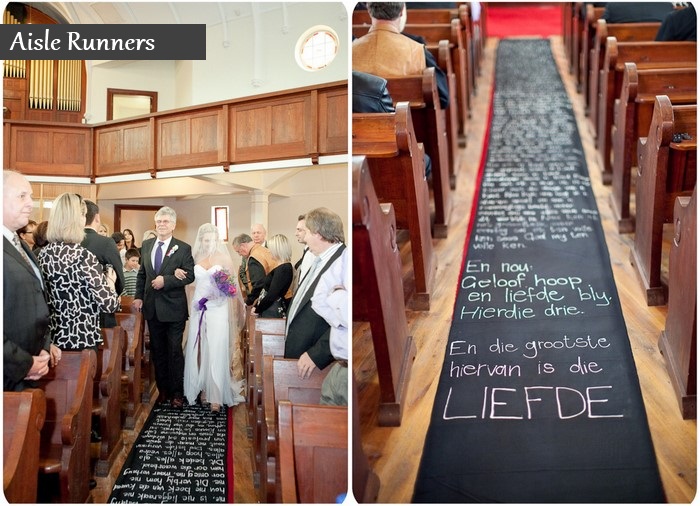
This aisle runner is so unusual, and looks like a great way to personalise a wedding ceremony as an alternative to the tradional monogrammed version. Image by lizellle lotter photography via Bijoux Bride
>> If you want to find wedding runners, or other decor items, see our Suppliers Directory for Decor Hire
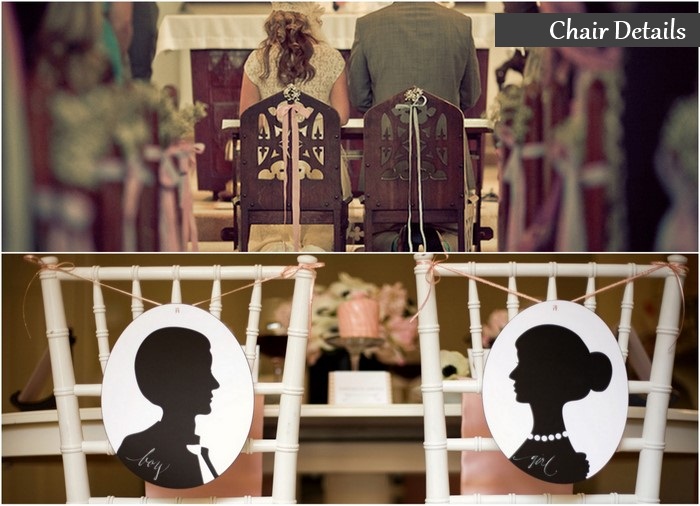
A way to add a little detail to your ceremony decor is to make a feature of the chairs you will sit on. You can decorate with some flowers, or sashes, or even try bride and groom signs for something a bit more modern. Top image by Dave McClelland. Bottom image by Connie M Chung via SoHappyTogetherBlog, signs designed by OliveHue
>> Find chairs like these for your cerempony, try our Directory in Furniture Hire
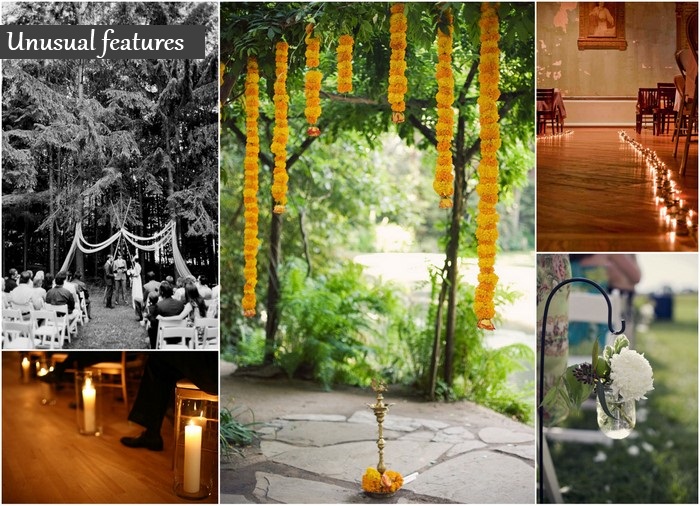
If you're looking for something more artistic, try creating your own 'alter'. This teepee(/tipi) style feature (top left) is made using wooden sticks, ribbon and is held up by branches of the tree behind. Image by The Wedding Artists Collective via 100LayerCake. This Indian style garland feature (middle) and traditional Indian lamp is a beautiful way to add some vibrance and custom to the ceremony alter. (Please check out this entire wedding HERE, as posted in 100LayerCake, the groom is the co-founder of Pinterest and the couple walked down the aisle to 'You're so cool' -the music from one of my favourite romantic movies of all time, True Romance. Amazing.) A great way to decorate your ceremony on a budget is to use fairylights (top right). Hanging vases (bottom right, image by Cat Satre via StyleMePretty) and pillar candles (bottom left, via ElizabethAnnDesigns) are beautiful ways to line the aisle.
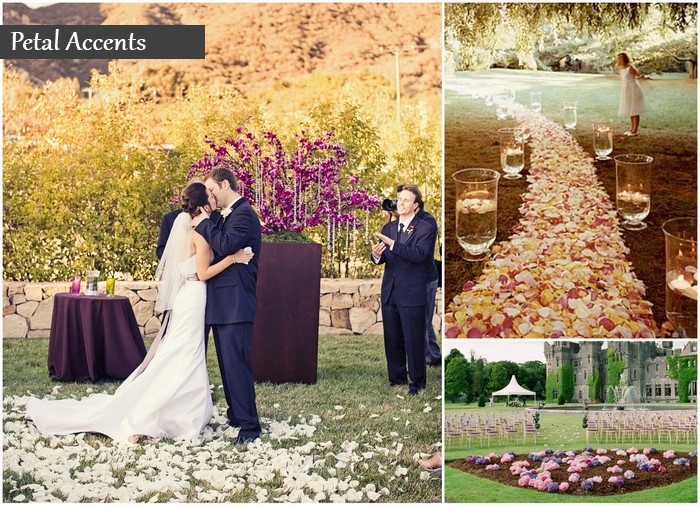
For an outdoor ceremony, petals are one of the most romantic ways to line the aisle. You can shape them into designs, scatter them, or place floating candles alongside them, they really make an impact! Left image by Mark Brook, top right via MarthaStewartWeddings, bottom right by Elizabeth Messina.
>> Find your perfect Wedding Florist throught the WOL Directory
Related Content
-
DIY Comeback Queen
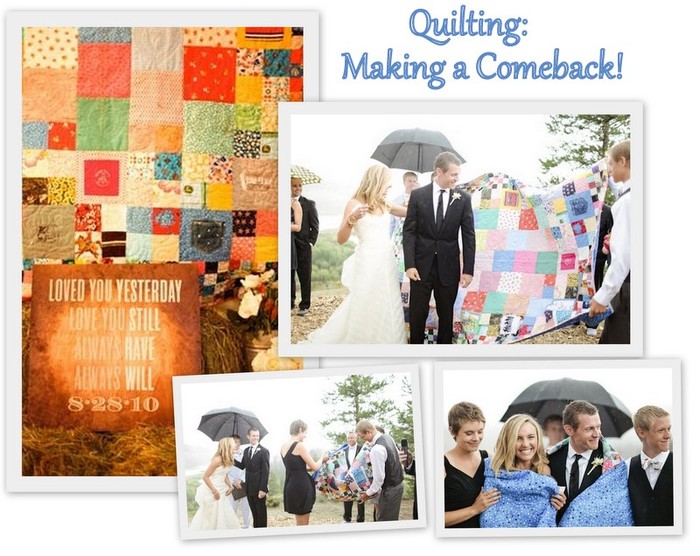
By KBI made a quilt for a Home Ec. project when I was about 16 years old. It was blue and pink and had a Mr. Men man on it (no particular character). I made a feature of his nose, using a towel-like fabric and padding it out so it stuck out from the rest of his body. To this day that quilt is the single greatest thing I've ever created. This is possibly the reason why I like this here idea so much.
I came across the DIY extravaganzafest that was Jess and TJ's wedding on 100LayerCake and immediately honed in on the eye catching quilt. The quilt was made from piece of fabrics that Jess asked her guests to send her months before the wedding. Her guests sent on pieces from t-shirts, table cloths, baby blankets etc (I know, it's hard enough to get a 'Yay' or 'Nay' text from most people). She then pieced the fabrics together and got a local embroiderer to finish it off.
I think it added a really nice splash of colour to her photos and was a brilliant way to make the guests feel part of the day.

Photos: http://giacanali.com/
Related Content
-
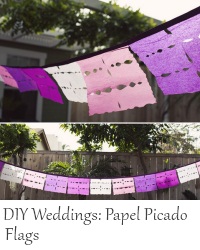
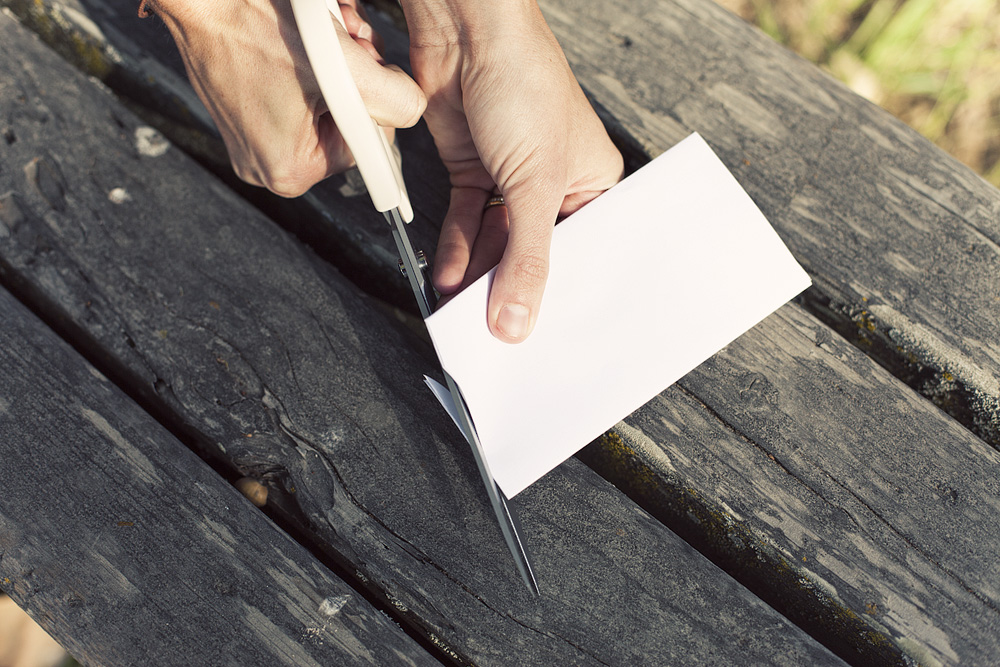
DIY Weddings: Papel Picado Flags
A cute and easy DIY project to create your very own Papel Picado flags. Hang them in the church or drape them around you reception room to help add a splash of colour to your big day.
Materials
� Various colours of tissue paper - maybe in your wedding colour theme
� Double sided tape or glue
� Scissors
� Ribbon
� Paper for template
Step-by-step
1. Fold paper for the template into 1/6s length-wise. Once paper is in 1/2, fold it into 1/3s.
2. Cut small shapes along the folded sides of the template.
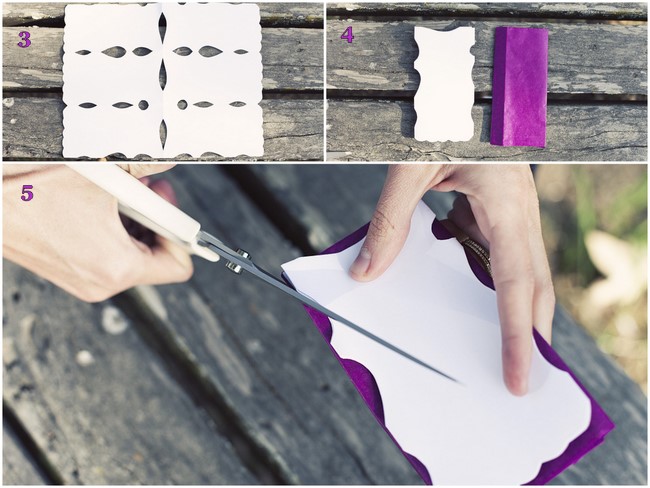
3. Open to see if you like the pattern.
4. Then lay the template over the tissue paper, which should be folded in the exact same way the template is.
5. Cut the tissue in the same pattern as the template.
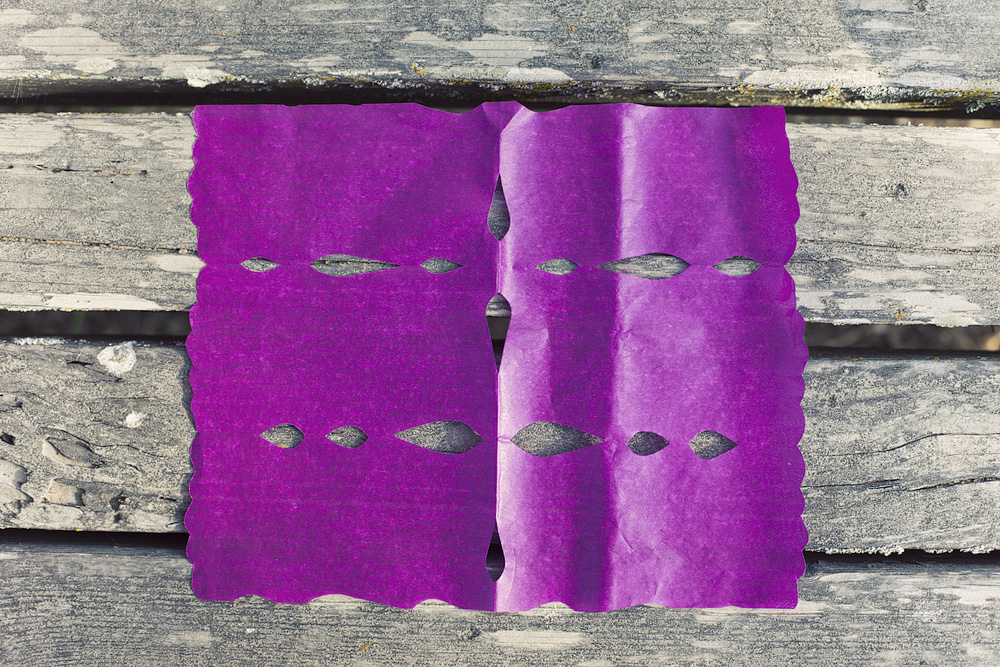
6. Unfold and repeat in the same way for other colours of tissue.
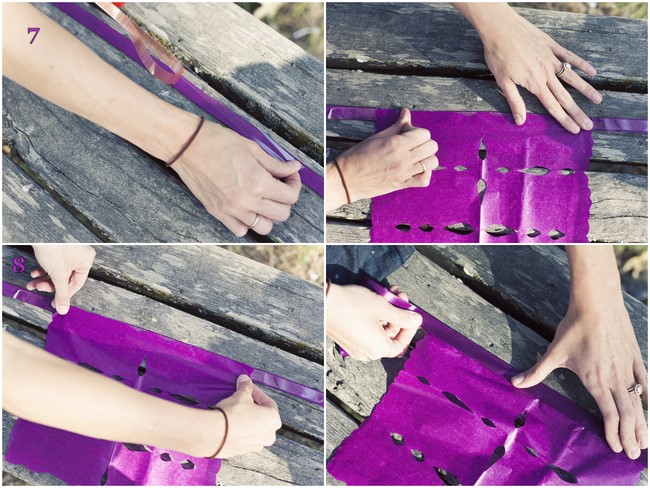
7. Lay ribbon out and stick different colour tissue flags side-by-side on the ribbon with the double sided tape or glue. Leave about enough space either side so the banner can be tied up.
8. Stick another piece of ribbon to the front side of the banner.
9. Now hang it up and stand back to admire all your 'hard' work!
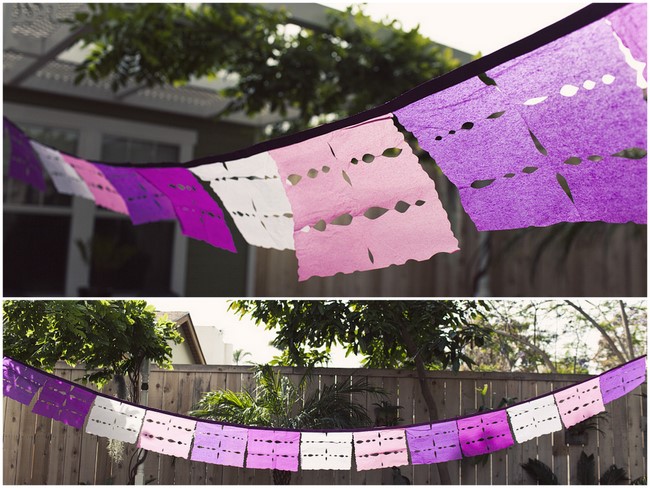
As seen on GreenWeddingShoes.com. Images by Katherine Elizabeth Photography.
Related Content
-
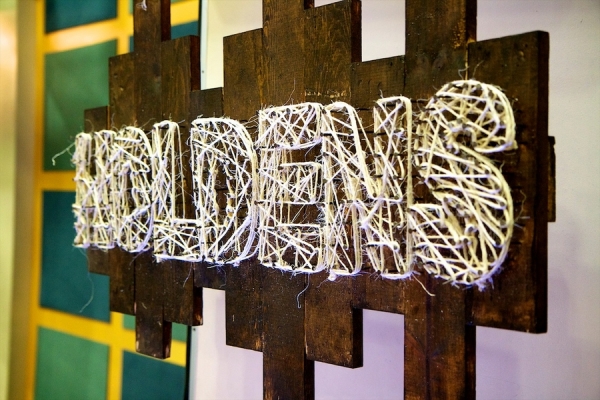
Give me a Sign...
By Karen Birney
From chalkboards to wooden blocks and steal hangers to paper garlands, wedding decor has gone sign crazy. Perfect for photobooth props or to give guests directions to the candy buffet (most important!), wedding signs are a super cute and easy way to give your wedding a little personal touch, and they often make great keepsakes too!
Here's some of our favourite, no matter you need a sign for...

Chalkboards, whiteboards, or even framed glass are perfect ways to give information to your guests, whether it be about what's on the menu,or where they can find your guestbook. Heartshaped slate, �8, from Slate Gift Company on Notonthehighstreet.com. Rectangle slate, �12.99, from Confetti.co.uk.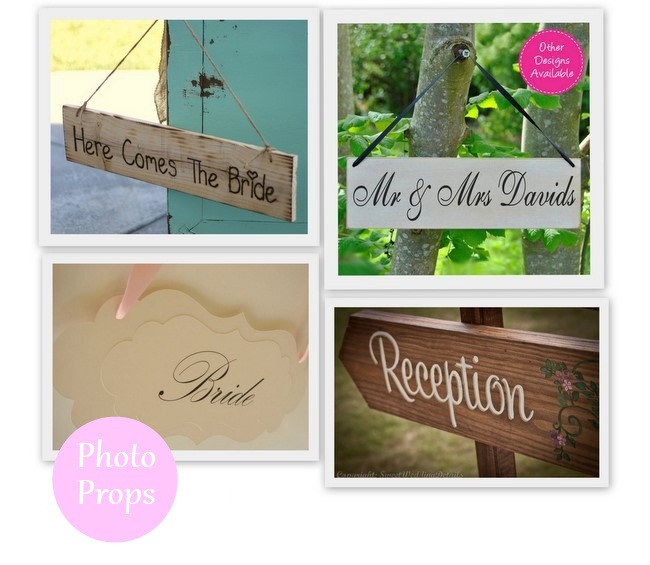
If your having cocktails outdoors, these cute signs will add some extra sparkle to your decor. "Here comes the Bride" sign, $34.99 by Bragging Bags on Etsy.com, "Mr. & Mrs. Davids" personalised signs, �7.99, Confetti.co.uk. "Reception" sign by Sweet Wedding Details, $26, on Etsy.com. "Bride" chair hanging sign, $24 by Wedology on Etsy.com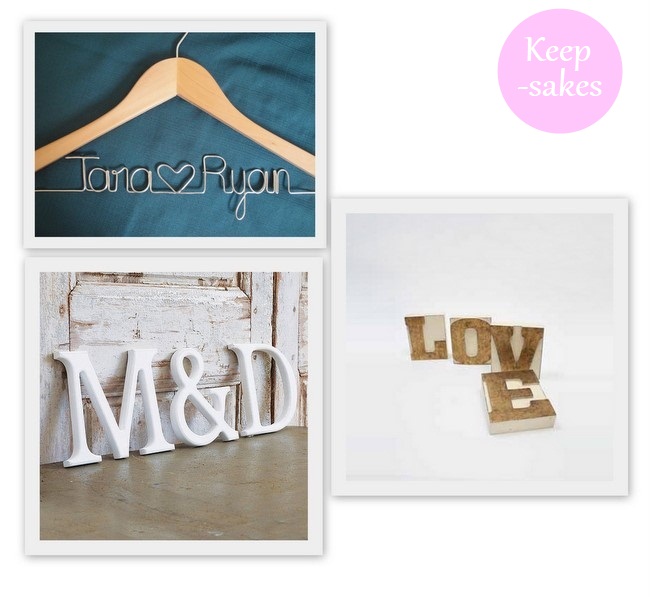
Each of these decorations make really lovely keepsakes for after the wedding. Personalised hanger from RockaBuyCreations, $26 on Etsy.com. Cream and gold LOVE blocks, �20 from Confetti.co.uk. Decorative Wooden Letters, �13, from Ali's House of String on Notonthehighstreet.com.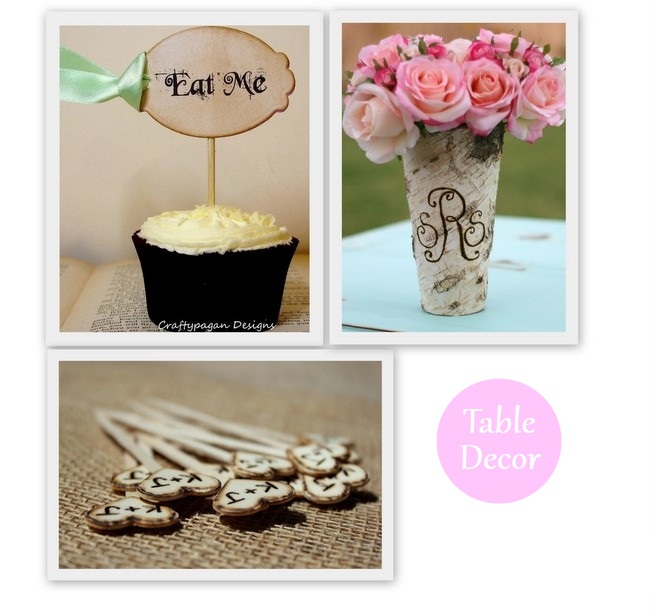
Vintage style cupcake signs, $75.60 for 50 signs, Crafty Pagan Designs at Etsy.com. Personalized Custom Engraved Monogrammed Tall Birch Bark Wood Vases, $390 for set of 20, Bragging Bags on Etsy.com. Personalised cupcake toppers, $12 for 12 by Creative by Heart on Etsy.com.
If you want to send out personalised Thank You cards after the wedding, these are perfect props for your photos! "Thank You" burlap bunting, $20 from Mirtillo Shop. LOVE burlap banner, $14 from Lazy Caterpillar. Personalised parasol, �35 from Confetti.co.uk.
Related Content
-
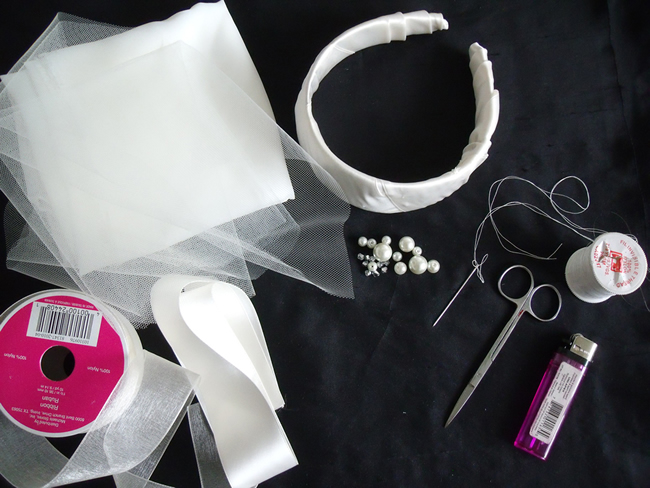
DIY Wedding Headband
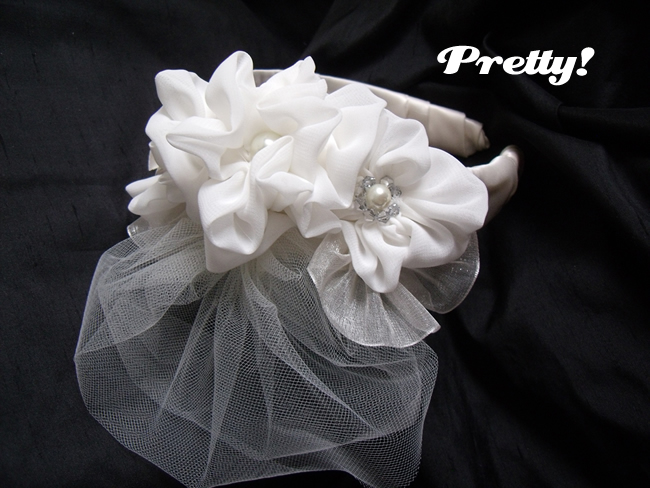
Made of pearls, shimmering beads, ribbon and netting, this DIY bridal headpiece is the perfect compliment to your dream dress.
Materials:
- Fabric or ribbon covered headband
- Needle and thread
- Scissors
- Fabric
- Tulle
- Ribbon (satin and organza)
- Beads
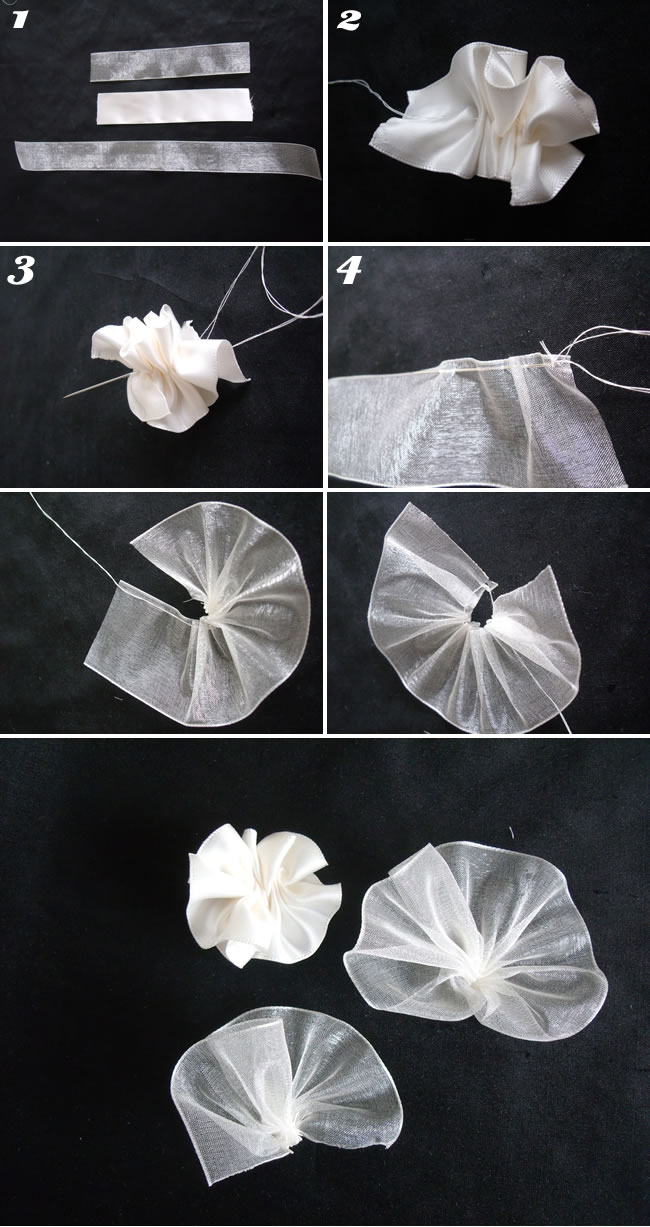
Ruffle Ribbon Flowers
- Cut about 8 inches of satin and 16 inches of organza ribbon.
- For your Satin Ruffle Flower, sew a running stitch up the middle of your satin ribbon. When you get to the end of your ribbon gently pull on your stitches to get a ruffle.
- Sew one edge to the other.
- Then repeat this step with the organza ribbon.
- Add any beading or other embellishments that you’d like.
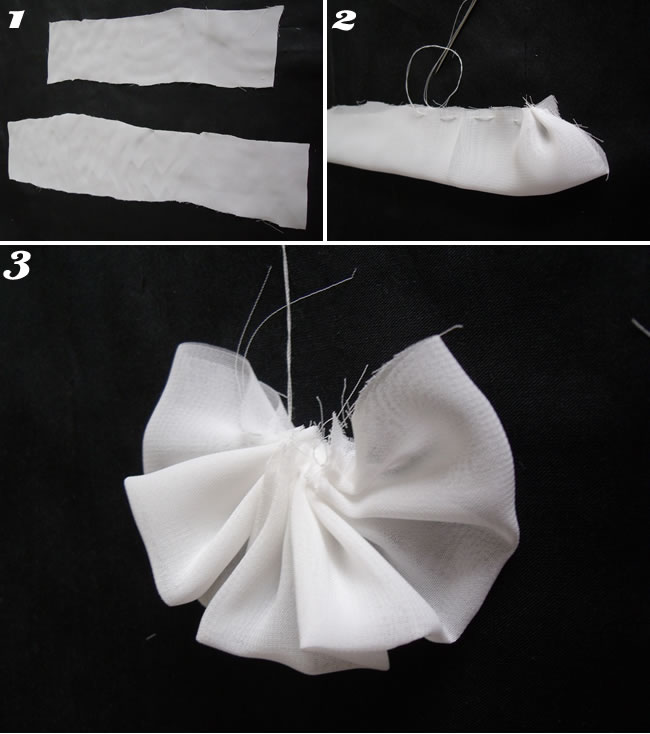
Part 2- Fabric Ruffle Flowers
- Cut out two strips of fabric. You can play around with the lengths and widths to get different sized flowers.
- Fold your fabric in half and sew a running stitch up the cut edges of fabric.
- When you reach the end of your fabric gently pull on your stitches to ruffle the fabric. Sew the edges of your fabric together. Repeat on second piece of fabric.
- Add any beading or other embellishments that you’d like.
Part 3- Tulle Pouf
- Cut out two rectangles of tulle; once again you don’t need to be precise and you can experiment with different sizes.
- Sew a running stitch down three sides of the rectangle, leaving one long edge of the tulle free. Gently pull your stitches to form your pouf. Repeat on second rectangle. Sew both poufs together through the middle.
- Add any beading or other embellishments that you’d like.
Part 4 - Headband
- Sew your ruffle flowers to your headband. You can assemble your flowers in any way you’d like but make sure the pouf is facing downwards.
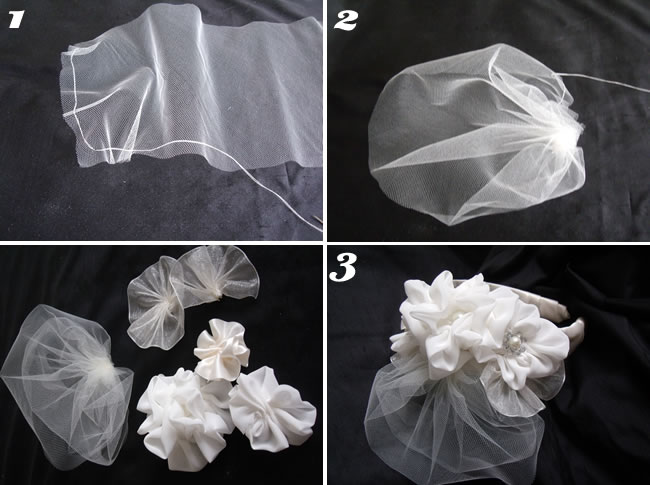
This DIY wedding headband came from a tutorial with Corrine of Buds and Blooms. To see more great DIY wedding ideas have a look at the La Belle Bride.
-
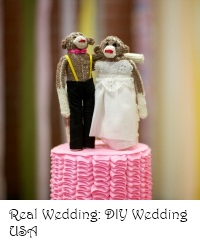
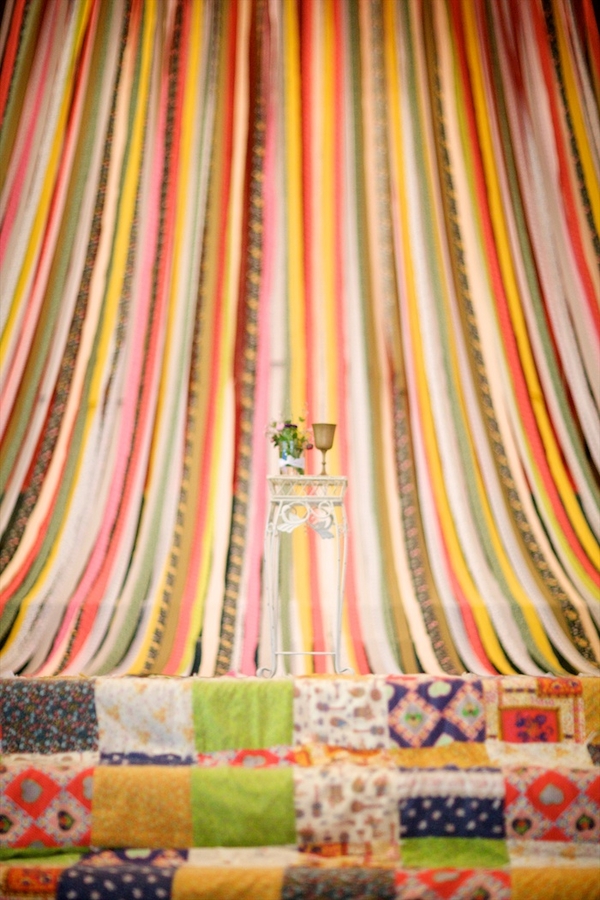
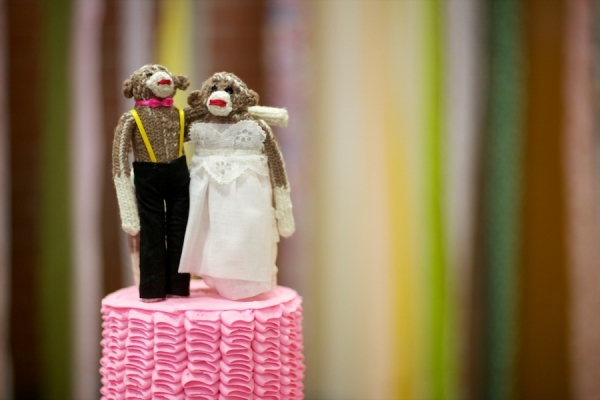
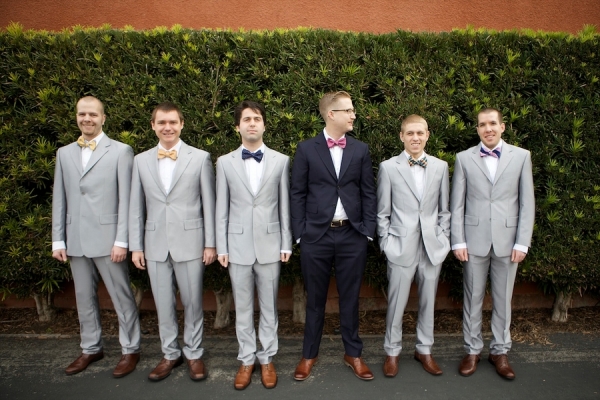
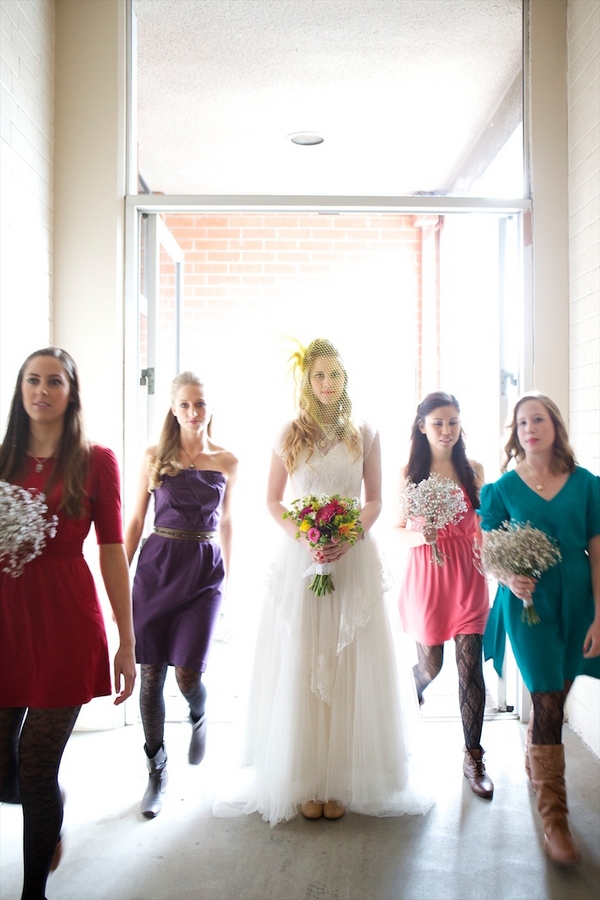
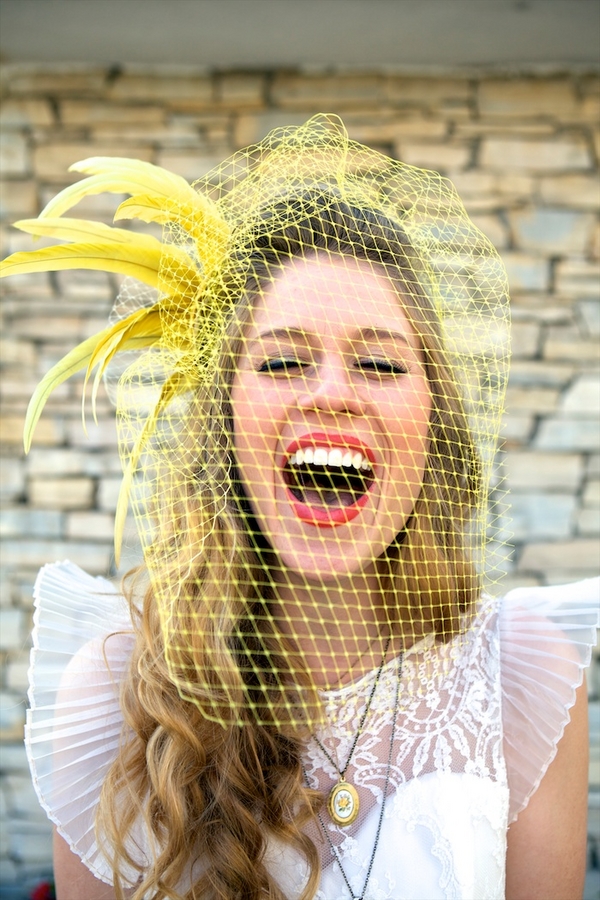
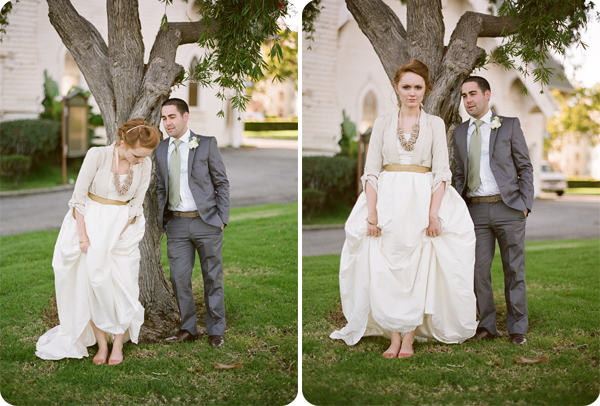
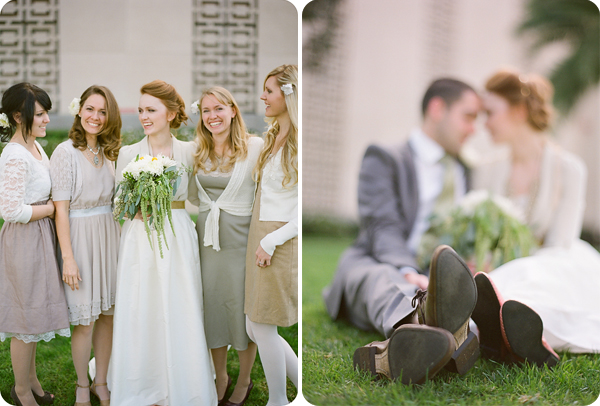
DIY Wedding USA
When we saw this amazing real wedding on the Ruffled blog we fell head over heels in love. The couple got married in Long Beach, California. The groom, Jonathan, is a jeweller who made all of the groomsmen’s cufflinks, the centrepieces and the altar, while Amy, the beautiful bride, took on the flower arrangements.
They lined the altar with Amy’s grandmother’s quilt, which was also used in their engagement session and it was their main source of inspiration for their wedding. She wore a vintage wedding dress she found in Chile and had it altered with added flutter sleeves. Her amazing yellow birdcage veil is to die for! Incredible photographs by Chad Cress.
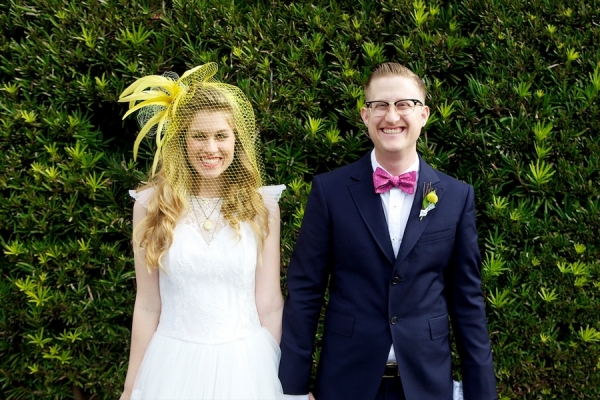

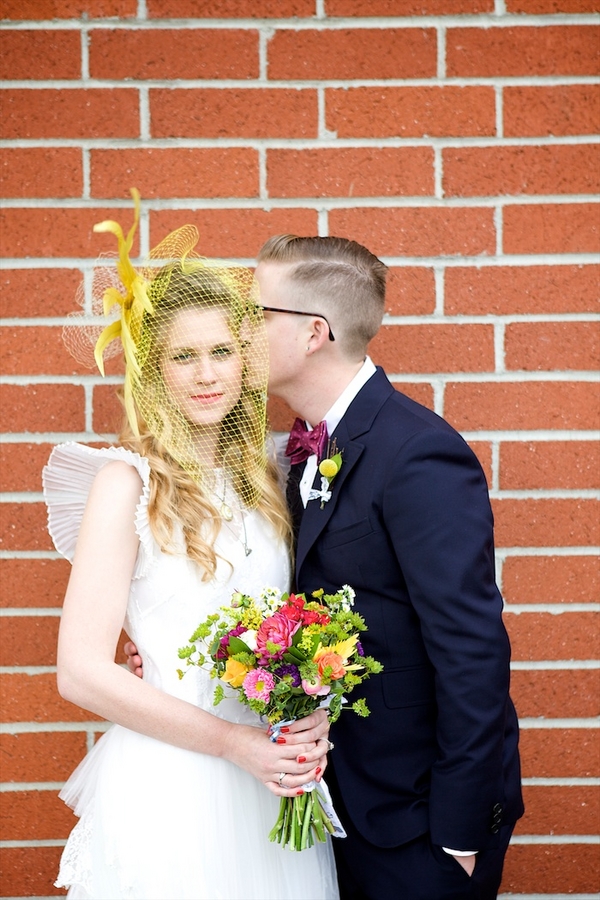
For more of this wedding check out the Ruffled blog.
Related Content
-
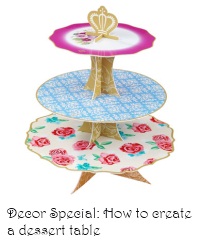
Wedding how to: The Dessert Buffet and Candy Table
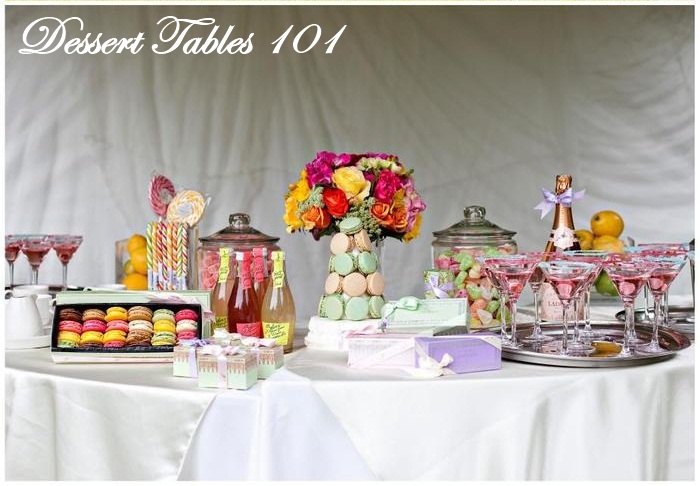
By Karen BirneyThere's no better way to cater for the entire family's tastebuds than with a dessert table. Dessert tables aren't only scrumptious to eat, they are also fabulous to look at and are a great colour feature for your reception! Try adding an array of sweets to your table, from cupcakes, to hard boiled sweets, to macaroons to lollipops or rocks! You could also whip up some nice fruit punch and sit the colourful jugs at the side of the table.
Most of all have fun with it! Compiled by Karen Birney
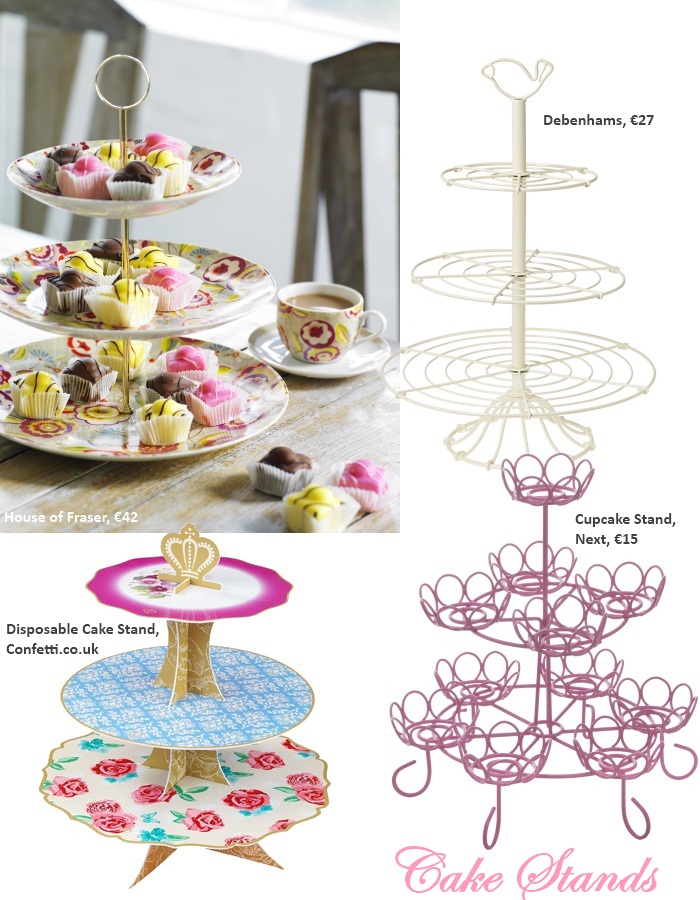
There are some cute cake stands around at the moment, but if you can't spare the expence, go for a cardboard popup cake stand. These are perfect if you only plan on baking once in your married life!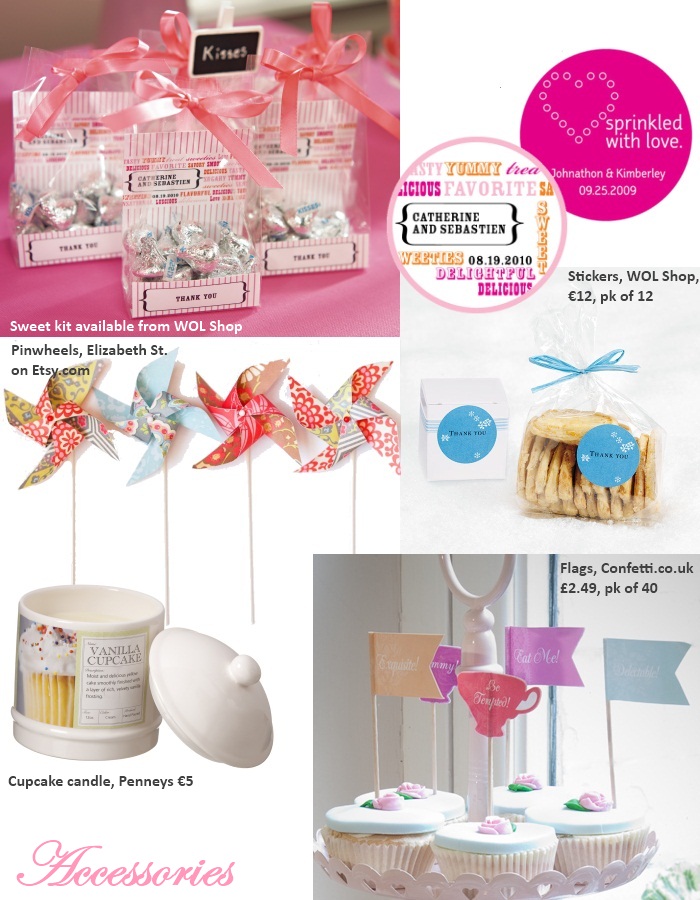
There are some great additions you can make to cupcakes, like floral pinwheels or little flags, check out how B Magazine got on with their cupcake DIY projects here.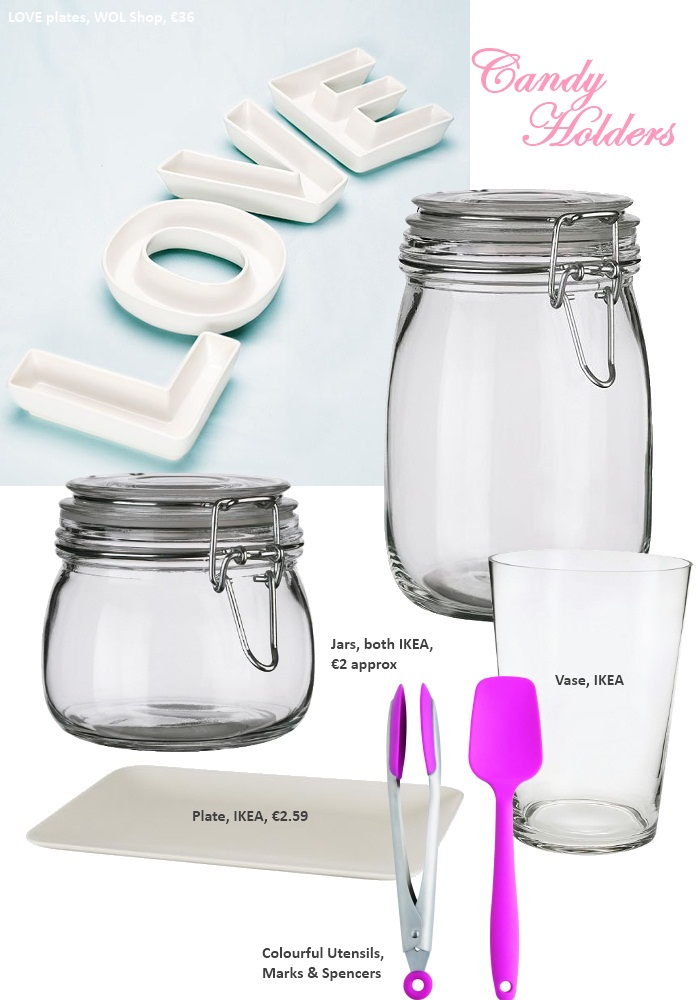
-
DIY Festival Wedding
We found this little beauty of a wedding on Style Me Pretty yesterday and knew we had to share! We are all feeling the festival vibe here in WeddingsOnline (with our very own WOL Fest just around the corner) and this wedding is the PERFECT example of a festival theme done incredibly well!
The wedding took place in the English Countryside and was photographed by Chris Barber Media
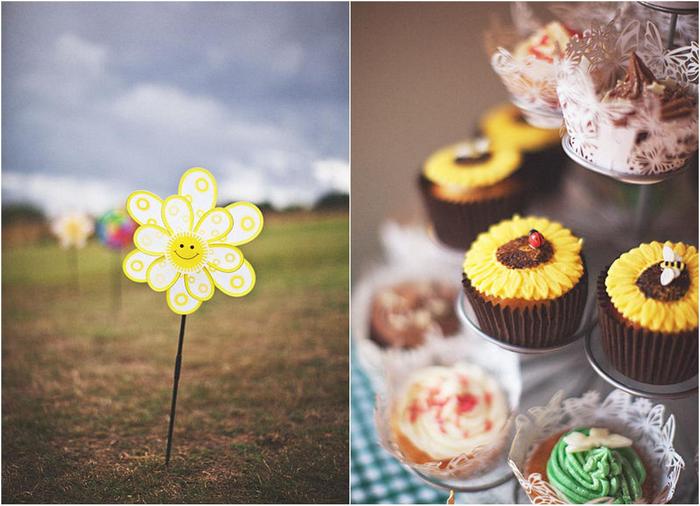

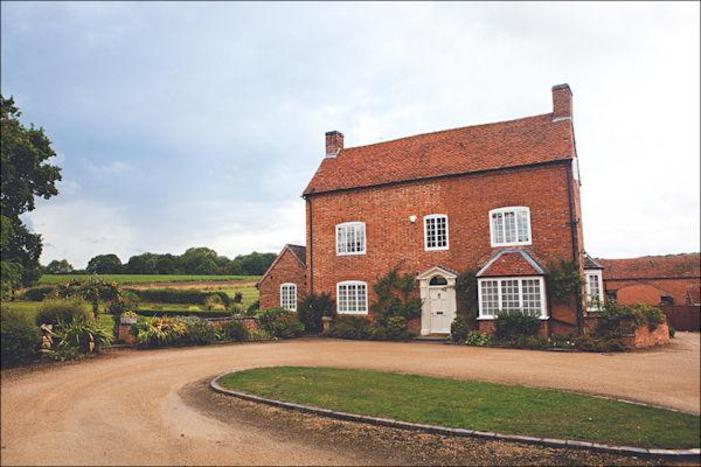
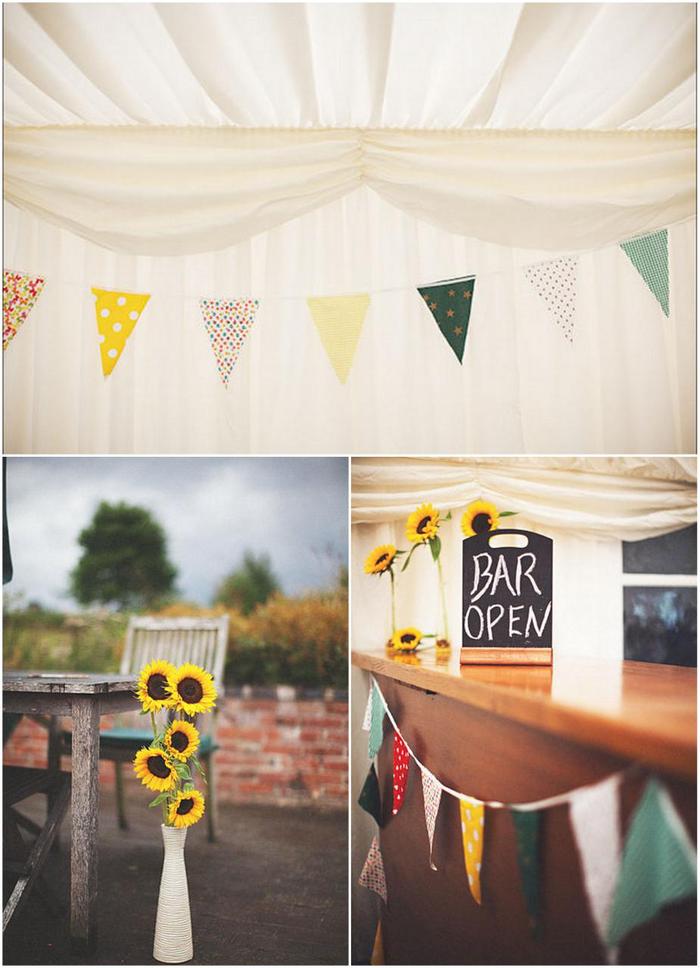
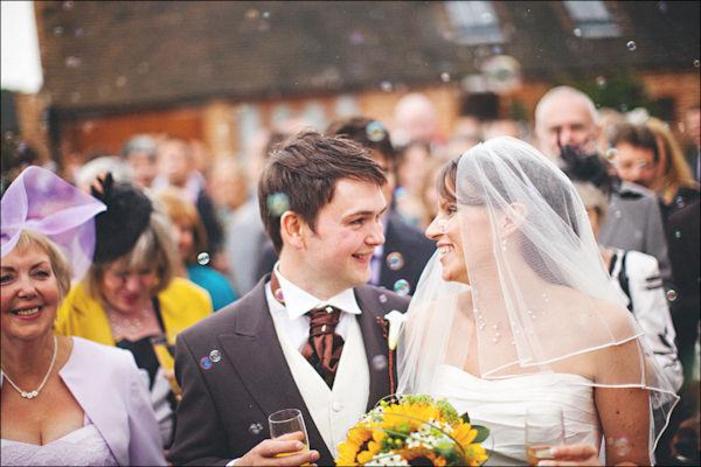
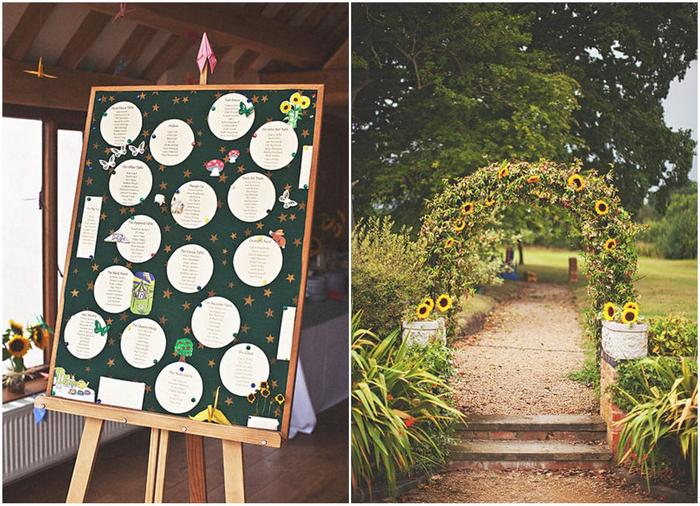
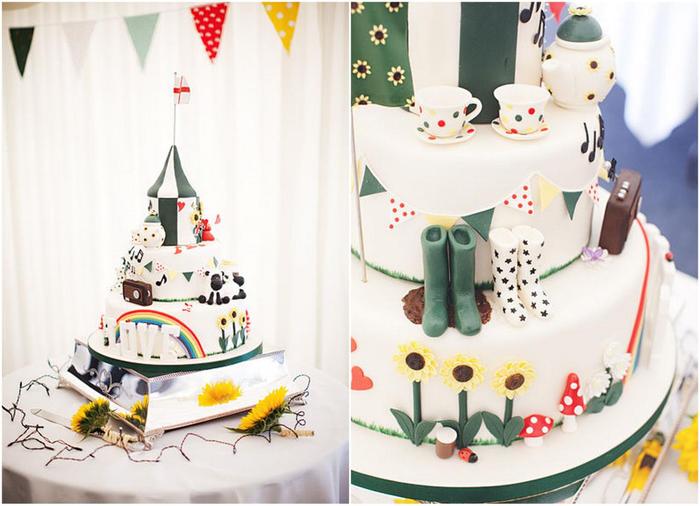
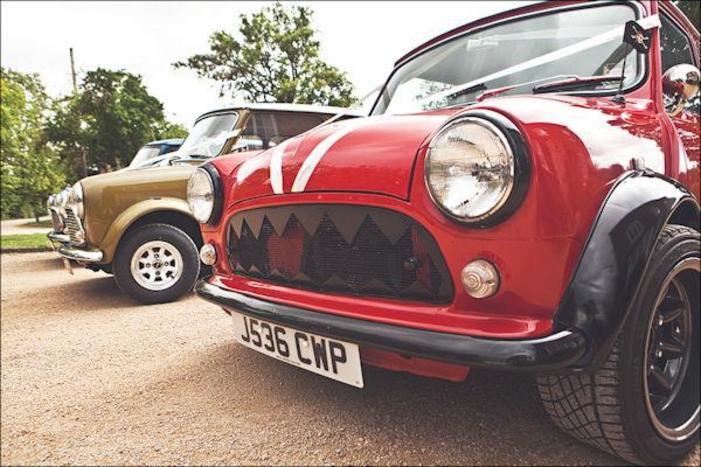

Check Style Me Pretty for more gorgeous details!
-
DIY in Dublin
The DIY bride's guide to the best shops for creating an amazing wedding and adding a personal touch.
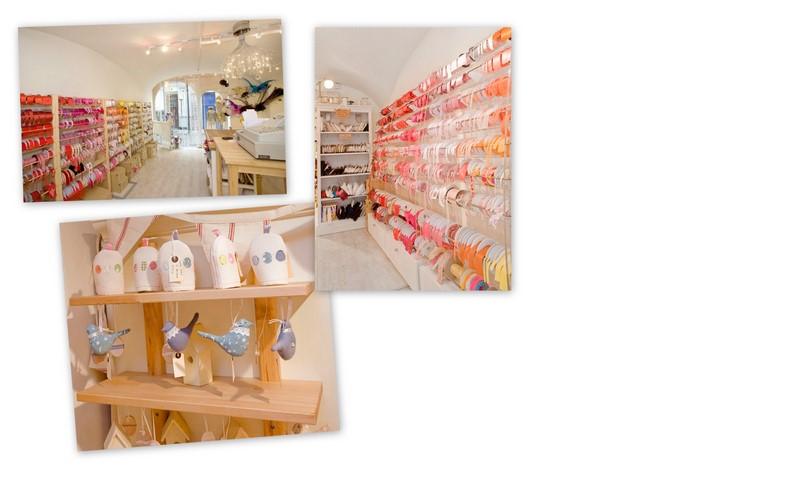
A Rubanesque in the Powerscourt Centre is a crafty lady's dream. Stocking internationally sourced ribbons, lace, trimmings, buttons, fabrics, notions and so much more, you can also go to Alexa O’Byrne and her team with your idea and they'll help you put together anything you need for your DIY project!

Hickey's Fabrics on Henry Street is the perfect place to go for whimsical wedding fabrics. Whether it's bunting, pinwheels for your photo props or little bags for your flowergirl to hold her silk petals, Hickey's have a huge range to choose from. Their in-store pattern books are a huge help for getting ideas and the staff are fantastic at guiding you through your project. They also have a whole section dedicated to the bride-to-be, if you fancy a real challange with ilks, satins, organza, chiffons, georgettes and veils....
Check out how to make some cutesy bunting (perfect for an outdoor reception!) here: http://www.joyfulabode.com/2008/12/02/how-to-make-a-bunting-holiday-decoration/
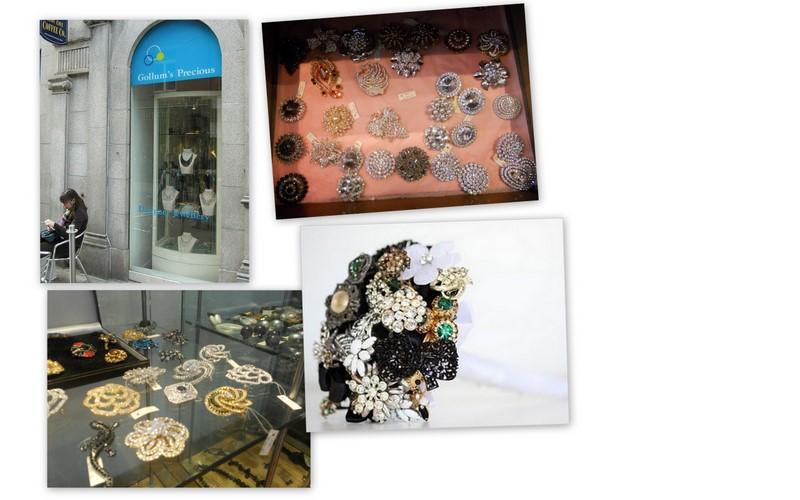
Gollum's Precious in the Powerscourt Centre has a fabulous selection of vintage brooches in store which you can mix and match with your own to create a beautiful brooch bouquet like the one pictured. See this link for how to design your own: http://www.fancypantsweddings.com/how-to-design-a-brooch-bouquet/

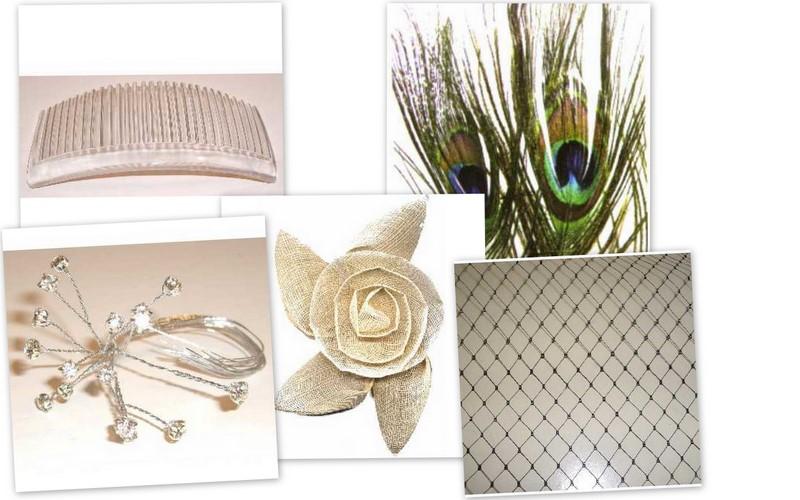
Dublin Woolen Mills on the Ha'penny Bridge is the perfect place to go if you're planning on making your own birdcage veil. They have the perfect netting as well as great sinemay flower which are great as bases of fascinators. They come in a natural colour and can be dyed. You could also pick up some stricking peacock feathers here to add to a bouquet, centrepiece or use as your groom's buttonholes.
See our DIY birdcage veil article here to see how it's done: http://weddingsonline.ie/planning-tips/article/166/diy-birdcage-veil/
Check out more DIY projects and chat to the Wollies about you DIY plans here: http://weddingsonline.ie/discussion/viewtopic.php?f=13&t=280025
And have fun!
-
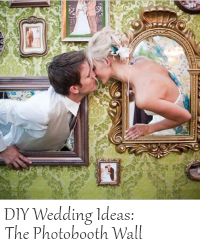
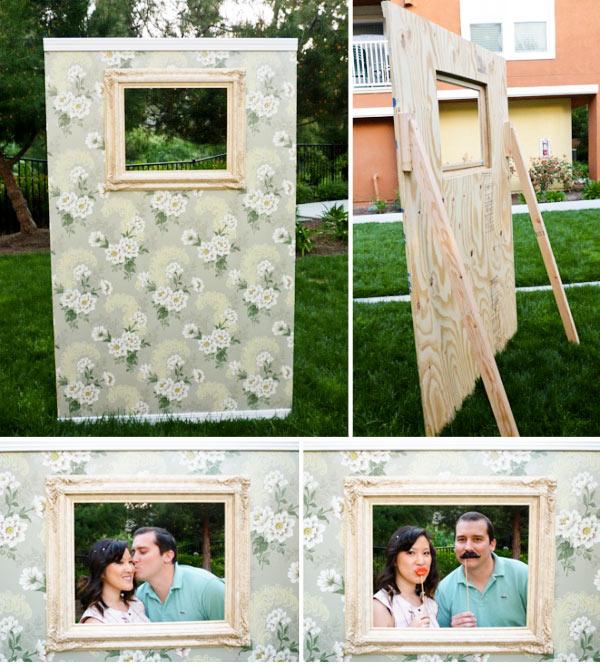
DIY Photo Wall from the Ruffled Blog
In honour of the new DIY thread on Old Faithful I was inspired to put up a DIY post. One of the Wollies mentioned a photo wall, which is an amazing idea. And it's so easy! Here is the DIY Photo Wall project from the amazing vintage bridal blog, ruffledblog.com,
What you’ll need:
- Plywood
- (2) 2’x3’ Wood beams
- Sawhorse
- Ruler/Measuring tape
- Hammer and nails
- Wood screws
- Handheld jigsaw
- Handheld drill
- Mod Podge
- Paintbrush
- Waterproof sealant
- Vintage picture frame (I got mine at a thrift store)
- Vintage wallpaper (eBay)
- Floor molding (optional)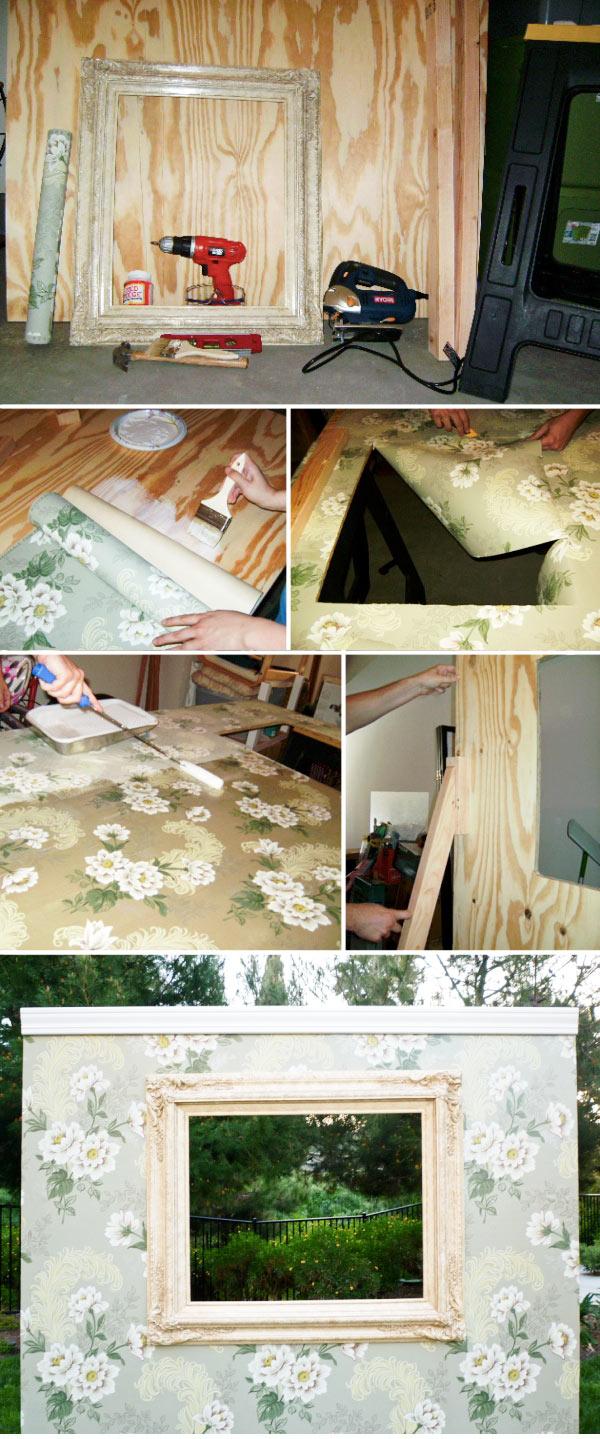
Instructions:
Step 1: The plywood usually comes in a 4’x8’ sized sheet. To make it easier, have the store cut the top for you - we asked for a 19” cut to make the final height 6’5”.Step 2: Lay your plywood flat on the sawhorse. Measure your picture frame. Make sure you start your measurements near the middle of the frame itself - you don’t want the plywood to show on the inside of the frame, nor would you want gaps around the outside of the frame! Decide where you want your frame to be, and draw your measurements on the wood.
Step 3: Use a drill bit large enough to make a hole the width of the jigsaw blade in all corners of your measurements on the plywood. Now use the handheld jigsaw to cut out the entire shape.
Step 4: Stand the plywood upright. Cut each of your beams to about 5’ high. Measure and cut a 70 degree angle off the top of the beam. Hold this up to your wood frame until the angle lies completely flat against the block. Now take a ruler and place it horizontally on the ground, against the bottom of the beam, and use it to draw a line against the wood. Cut with the jigsaw - this will make the bottom of the beam level with the ground. Using the excess wood, cut (2) 10” pieces to use as mounting blocks. On the “back” of the frame, nail a mounting block onto each side. Make sure you hammer the nails through the front, so the heads are flush with the wood. Set the (2) beams aside for later.
Step 5: Lay your frame back onto the sawhorse. Measure and cut your wallpaper to size. Working with one strip at a time, brush your mod podge (what I had on-hand, but if you have wallpaper paste, that would probably work well, too) onto the top third of the wood. Line up and press your wallpaper onto it. Run over the surface with a ruler or other flat object to make sure there are no air pockets. Repeat for the middle and bottom third and all remaining strips of wallpaper until the entire front of the wood is covered. Let dry for at least 24 hours.
Step 6: Brush a thin layer of waterproof sealant over the entire surface of the wallpaper. Let dry for at least 24 hours.
Step 7: Optional: We really wanted to make it look like a piece of an actual wall, so we cut (2) 4’ long pieces of floor molding and attached one to the top and bottom of the wood frame, with Gorilla Glue.
Step 8: Stand the wood frame upright. Take one of the 5’ beams that you cut earlier and line it up against one of the mounting blocks. Drill 2 pilot holes (one on top, one 4 to 6 inches directly below the first hole) through the beam and partly into the mounting block. Next, screw the wood screws into the pilot holes. We used a 2” screw for the top (the thinner part of the beam) and a 2 3/4” screw for the bottom. Repeat for the other side.
Step 9: Mount your picture frame over the hole. Whew, you’re done! Now take your new “photobooth” somewhere pretty and snap away!
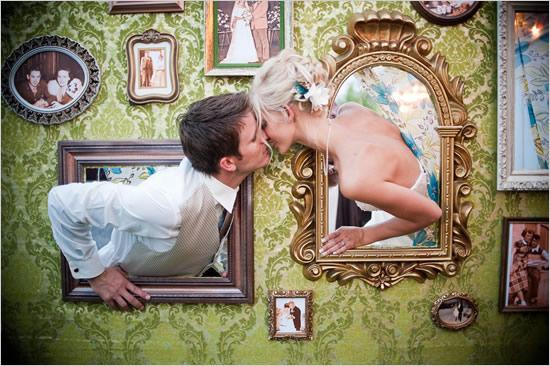
The above image is by Matt Shumate Photography, posted on The Wedding Chicks.
-
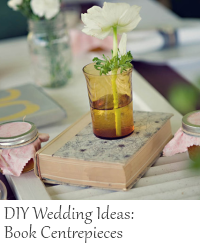
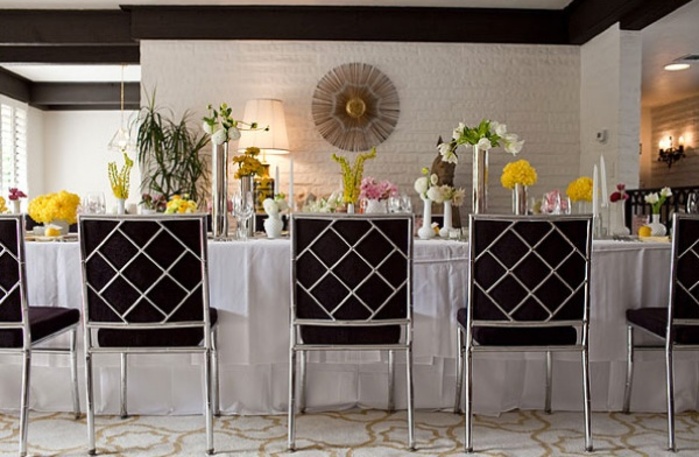
Book Centrepieces. Yes, please.
Just when you think you've seen it all you find a book centrepiece...Sometimes the creativity of others is just plain mind blowing! I came across this little gem of a wedding on Green Wedding Shoes.
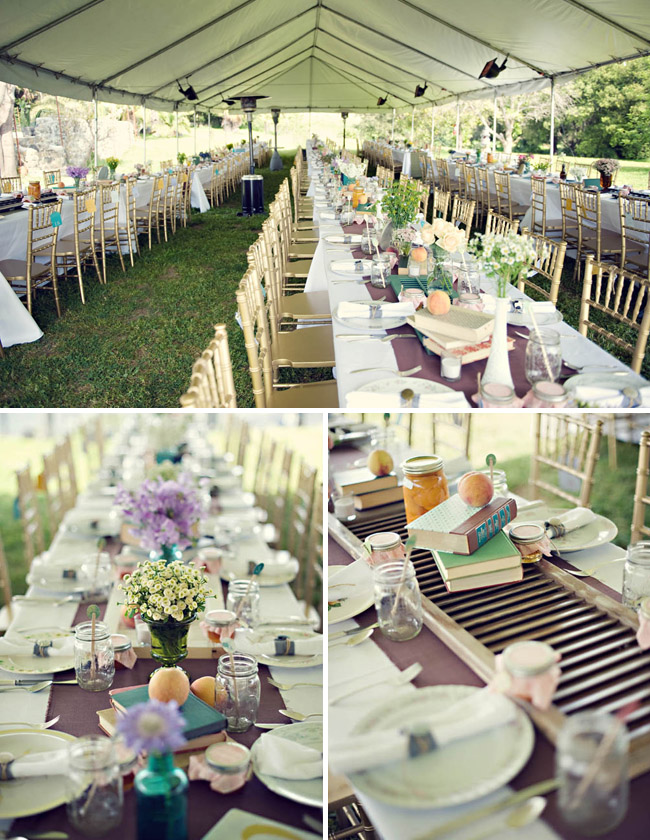
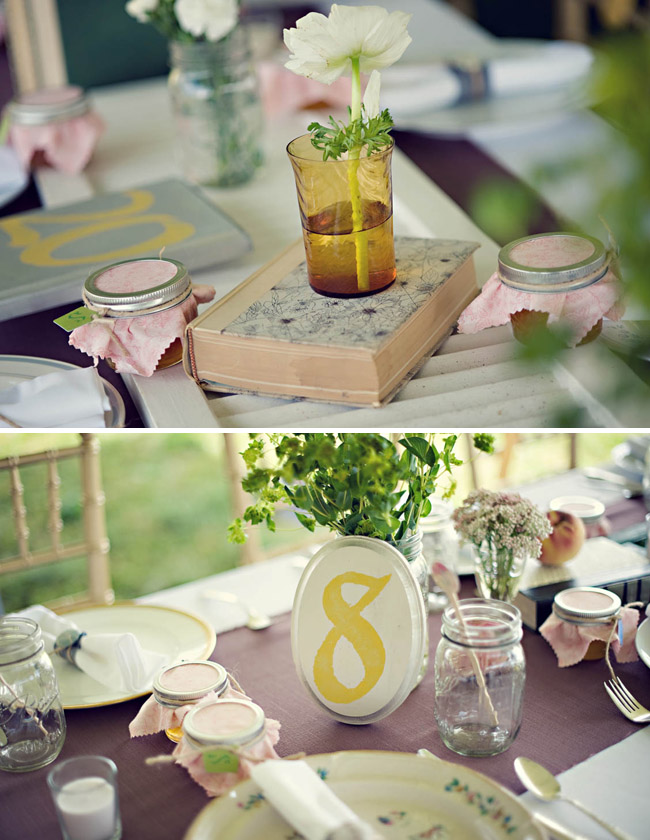
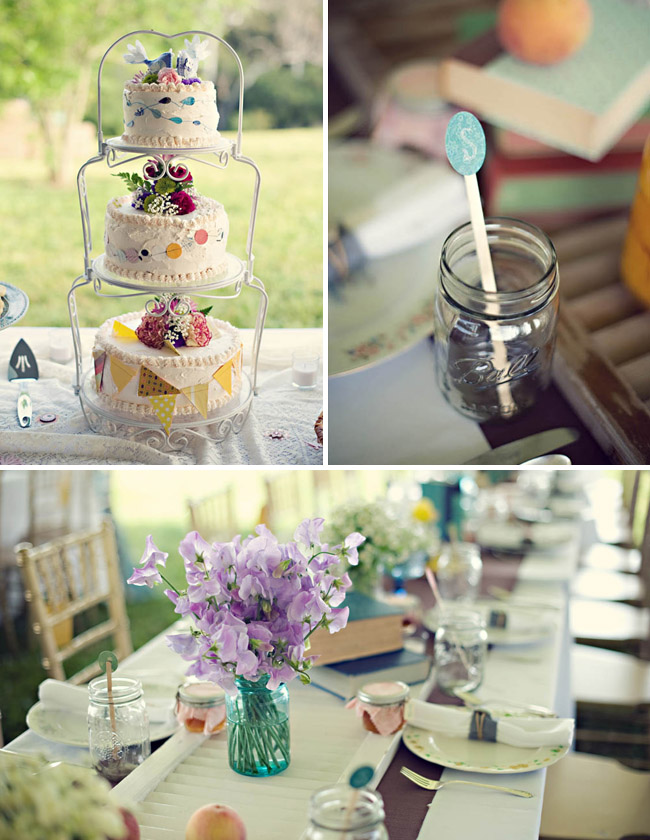
Vendors:
Designer & Coordinator: Carter & Cook Event Co.
Photographer: Colleen Sherman Photography
Videographer: 4120 Weddings
Florist: The Floral Lab
Paper Stylists: Posh Paperie
Venue: Condors Nest Ranch -
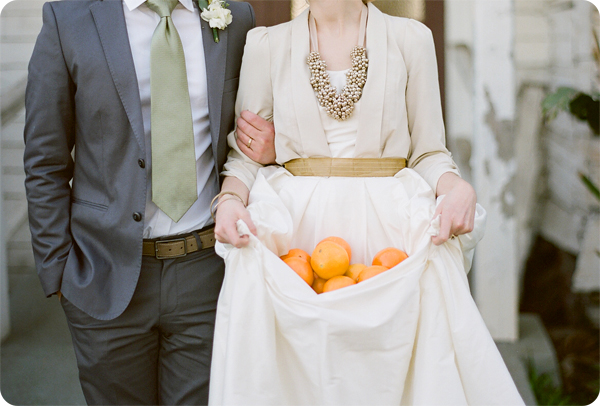
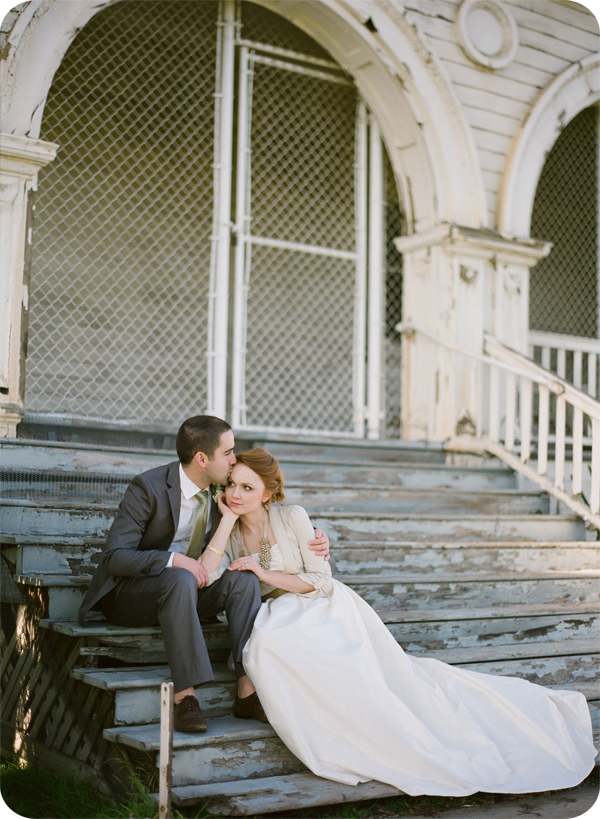
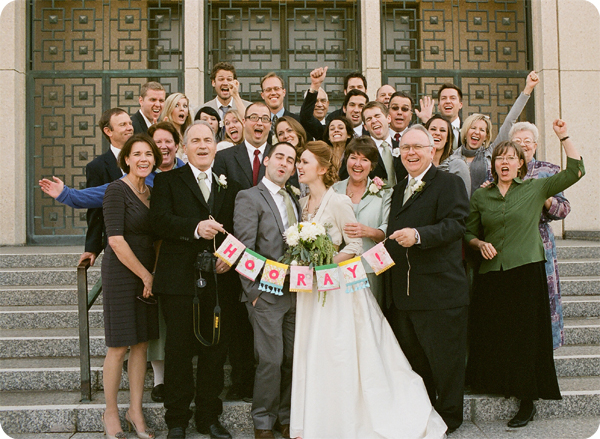
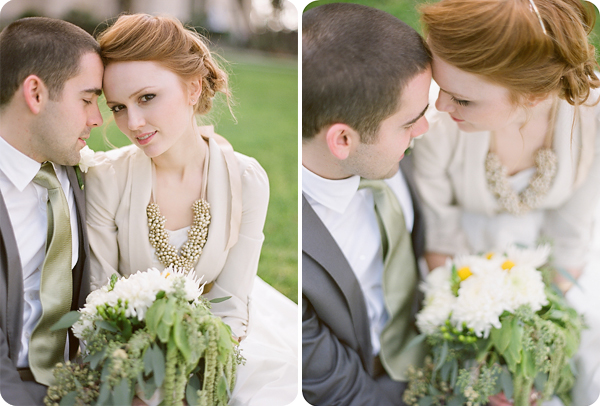
All Part of the Job
It's my job to know whats going on in the wedding world. It's my job to sift through the wedding blogs daily, to know the trends and know what photographers are on the 'it list'...and if you were to ask ...its my favourite part of the job. I love seeing how much talent is out there. And just when I thought I'd seen it all, I find someone totally new and totally amazing, like today. I came across Jill Thomas, who is responsible for these stunning wedding photos. Of course it doesn't hurt that the bride is beautiful and stylish. Oh and...her mother made her dress...yea...
http://jillthomasphotography.com/blog/
-
Dinner Party
My husband (so wierd to say that) and I are thinking about having Thanksgiving at our apartment this year. I think we both feel a little lost without wedding plans, so we are pouring our efforts into my favourite American holiday. I am thinking about dinner party table settings today. There is no better place to turn than to La Partie Events, an American Events company that totally gets doable DIY and simple tables that make big impact.
-
DIY Wish List
I tried to make chocolate covered strawberries last night, all in an effort to become more like Martha Stewart (part of a 'traditional housewife' phase I am going through-when I realised I am getting married in five months and can't even make my beloved a simple casserole). It seemed like a simple thing to try...strawberries are already made, no hassle there...the recipe said all I needed to do was melt some semi-sweet chocolate chips, which I thought even I could do. Turns out chocolate chips don't just melt, or they don't when you add butter to them (I thought the butter would make it creamy...it didn't). I ended up with a chocolate powder-ish, marshmallow- type structure, which needless to say is not fit for dipping strawberries in. Project failed. It is a good thing my domestic prowess is not the reason my fianc� is marrying me, and that he can cook really well! Anyways, it got me thinking about DIY and even though I would not dare try a DIY wedding project, I think people who can do it are so awesome! Here is my DIY wish list (things I wish I could do if I was not arts-and-crafts-inept).
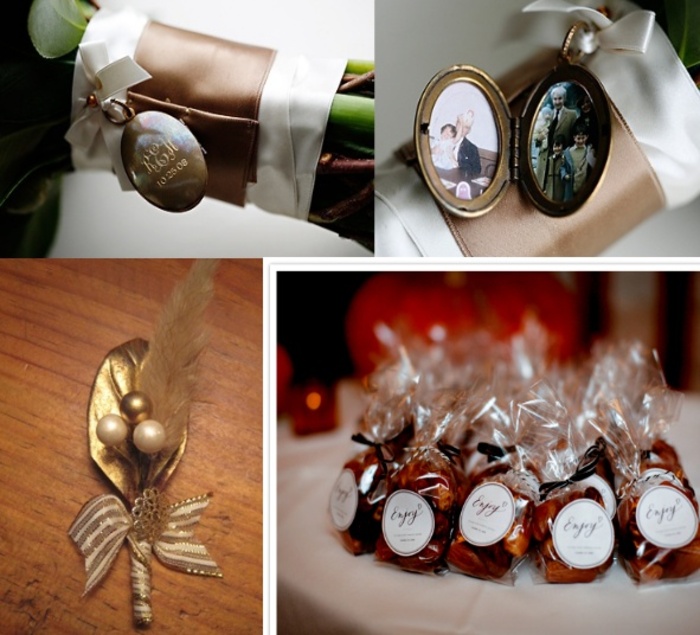
1st montage top left from Classic Bride, bottom left and right and above from 100 Layer Cake.
Categories
Archive
- May 2012
- April 2012
- March 2012
- February 2012
- January 2012
- December 2011
- November 2011
- October 2011
- September 2011
- August 2011
- July 2011
- June 2011
- May 2011
- April 2011
- March 2011
- January 2011
- December 2010
- November 2010
- October 2010
- September 2010
- August 2010
- July 2010
- May 2010
- April 2010
- March 2010
- February 2010
- January 2010
- December 2009
- November 2009
- October 2009
- September 2009
- August 2009
- July 2009
- June 2009
- May 2009
- April 2009
- March 2009
- October 2008
- September 2008
- May 2008
- March 2008
- November 2005
- October 2005
- March 2003
Follow Us: